It is way more complicated than needs to be to add custom sidebar icons to folders in Finder, but I still want to save this project.
2023.11.21.
2023.11.17.
The myth and reality of Mac OS X Snow Leopard
I agree with this. We would be better off with a more “natural” update cycle on the Mac. It’s a slower-moving platform these days anyway:
Regardless of the motivation, the annual updates are more of a burden than a blessing to many Apple customers, including myself. I wish that Apple would drop the artificial schedule and let the major updates come more naturally. This isn’t just the attitude of a developer and so-called “power user”. Many “normal” users”, the proverbial moms, feel the same way. Actually, my literal mom told me she doesn’t like the ceaseless annual major updates either. She’s learned from hard experience that they’re not necessarily safe to install. Major updates can be very disruptive, creating new problems and wrecking old workflows. The press is always excited by major updates, because they give the press a lot to write about, but the public is not as sanguine. We occasionally need a break of 23 months, or more, from computing disruption. That would be another Snow Leopard.
Related to this: The Mac, The Myth, The Legend: How Snow Leopard became synonymous with reliability
2023.10.31.
TaskPaper as an interstitial journal
I mentioned that I want to find a use case for TaskPaper, because I adore the app. Turns out™ it’s actually pretty good at being a journal and an outliner app. I created a new file and started logging today’s stuff. This is what it looks like.

It is a mix between a capture tool, a journaling tool, and a temporary task management tool. Basically the digital replica of my Field Notes notebook.
2023.09.18.
Download iOS icons for Safari web apps using Shortcuts
I love how you can save web apps into separate apps via Safari in Sonoma like you can with Fluid.
Safari tries to fetch the default icon, but sometimes it’s not that pretty or it’s even in a wrong aspect ratio. Finding proper app icons is hard, but a lot of web apps have iOS versions, so why not use their icons?
I created a shortcut, which lets you search the App Store and download the raw app icon. Now you can also use the proper iOS style icon for the web app.
You can download the shortcut from here.
Here’s a video on how you can use it.
2023.06.09.
Saving Siri replies as images
I just discovered that you can drag out complete Siri responses on the Mac and save them as images. It can be useful for saving reference data or images from the web.
Of course, you can also take a screenshot of the Siri window using the
2023.03.19.
Notational Velocity and Twitter as Birdhouse for Mac
This is an old post about how we can select text in any app and send it to places:
Here’s an nice solution to something I’ve been wanting. I love Birdhouse for iPhone, which stores tweets until they’re ready for publication. There’s no Mac alternative, so I’ve been putting potential tweets into Notational Velocity, and then copy-and-pasting them into Twitter when ready.
Today, MacStories points out that Twitter for Mac adds a contextual menu item that lets you tweet nearly any text you’ve selected in Mac OS X. You see where this is going: I can call up Notational Velocity with a keystroke, right-click on a tweet and send it off via the contextual menu. Awesome!
Translating this into the blogging world: we can publish micro posts directly from The Archive – which is the modern version of Notational Velocity – (or any other Cocoa app) using MarsEdit’s new Micropost feature.
2023.03.16.
Of course, we need to merge the Mac and the iPad…
We’re entering the spring, and the Mac and iPad Pro are on a collision course.
How about, no?
Because Federico doesn’t like Stage Manager and iPadOS doesn’t have multi-channel audio capabilities currently, I don’t want my iPad to become a Mac, and I don’t want my Mac to have a touchscreen (and become an iPad). And I especially don’t want them to be merged into one device (buy a Surface Pro if you want to have everything in one device, that will surely be fun).
I fear that I’m going to have to wait a couple of years for the Apple computer I want to exist, and I’m not sure anymore that iPadOS can evolve in meaningful ways in the meantime.
And I fear we will end up with an OS that is just copying macOS because we must repeat the same “Apple can’t evolve iPadOS” narrative on MacStories every two years.
While discussing iPadOS, I’m also tired of hearing about the “there are no pro apps for the iPad” argument. Let me tell you something: there are many pro apps available for the iPad, only they feel different since the device these apps are running on is very different.
Where are the pro app reviews of Affinity Designer, Affinity Photo, Affinity Publisher, or DaVinci Resolve on MacStories?
And what about Ulysses, Craft, Things, MindNode, Pixelmator Photo, or Keynote, which are fantastic on the iPad? Are those pro apps enough? I use these apps every day for “serious work” on the iPad, but I also have other pro apps on my Mac for development because it is just better for that task.
Or should we have Final Cut Pro and Xcode for the iPad? That’s what Apple pundits mean? Are you seriously expecting Apple will port FCP with all its features available in the 1.0 release, and it will be usable on an 11-inch iPad Pro?
I’m sure Apple will release more of their pro apps for iPadOS down the road, but don’t expect it will work like the desktop version. Apple pundits, of course, will complain about it not being like the desktop version, like they do with Photoshop being simpler on the iPad.
Let me remind you that Photoshop and Final Cut Pro (or Logic Pro, for that matter) are apps with decades of development history. Nobody will bring the same level of functionality to the iPad on day one. If you want to use the desktop version of Final Cut Pro, then use the damn desktop version of Final Cut Pro.
Let’s not forget that iPad Pros, which are at the top of the food chain for iPadOS, have the same CPUs as Macs at the bottom of the food chain. If we consider a MacBook Air mainly made for everyday tasks (maybe with a bit of “pro-work” here and there), what performance are you expecting from an iPad Pro with the same CPU?
There are many low-hanging fruits to be fixed on iPadOS, but let the damn thing shine on its own. If Apple merges these two platforms, like how pundits want them to, we will end up with a freak-show.
2023.03.05.
The first demo of RubyGPT integrated into macOS
As an AI language model, ChatGPT has gained a lot of attention lately. It is widely known for being quite powerful and having impressive natural language processing capability (especially for programming). This is why I decided to create a Ruby gem, RubyGPT, built on top of the newly released ChatGPT API which will enable me to chat with ChatGPT from the command line.
I recorded a demo of how RubyGPT works. I encourage you to watch it to understand better how this tool can make interacting with ChatGPT more efficient. It can be used directly from the command line or integrated into almost any editor and used like an interactive REPL.
I also created a corresponding AppleScript that passes the currently edited file from BBEdit into the `rubygpt` gem, parses the request then updates the file, making it feel like an editable conversation.
RubyGPT can be helpful in programming sessions, brainstorming, or general inquiry. It feels like you’re editing a Markdown text with an AI pair.
I may release this tool if there is a demand for it.
2023.02.18.
Bookmarked “Galaxy: Mac OS X Wallpapers Remastered“:
Classic desktop pictures modernized in 6K resolution and P3 Color Gamut.
Bookmarked “Scarlet“:
Scarlet is a personal issue tracker that saves to a file that you can include in your project directory, or anywhere you prefer. No accounts, no cloud services, no syncing, no third-party integration. Just a simple place to file away your project’s to-dos and close them when they’re complete.
2023.02.16.
Bookmarked “Montaigne“.
Make a website, blog, or portfolio using nothing but Apple Notes.
2023.01.30.
The Open in Kaleidoscope Service
The Services menu is getting a well deserved love from the Kaleidoscope blog:
The Services menu, originally part of NeXTSTEP, was introduced to the Mac with the advent of OS X in 2001. Throughout the entire history of OS X (now called macOS), Services never received a lot of love or major updates. Luckily, Services continues to work to this day and can be remarkably helpful.
One of the things I like about LaunchBar is its integration with the Services menu. There is no need to install a bunch of LaunchBar plugins; you can simply reuse already provided system services and share extensions from installed apps.

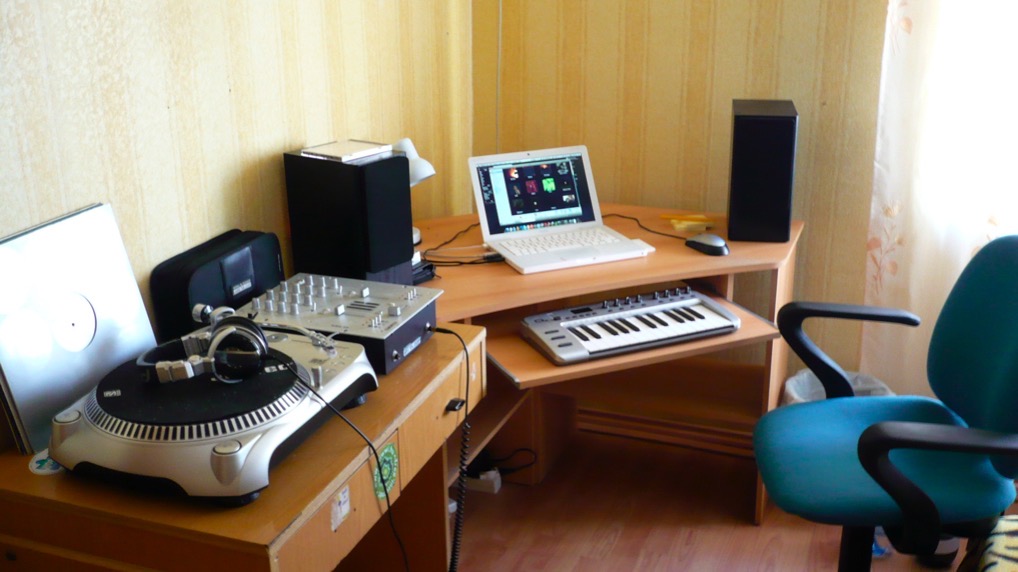
Browsing the web – 14 years ago!
I found this old video of me doing a morning browsing session on my old plastic MacBook. This video was recorded 14 years ago! Please don’t ask me why I recorded this.
Here are some interesting tidbits:
- We still had Google Reader.
- We still had MacThemes.net (man, I miss that!).
- Facebook was only used by Web 2.0 Starbucks hipsters.
- I still had my old blog.
- I was using Gmail and Mailplane.
Bookmarked “Grila – Calendar for keyboard addicts“:
Calendar for keyboard addicts instantly available on a hotkey
2023.01.11.
Re-reading 43folders.com
I recently started making read/review-related GTD projects to be more disciplined about consuming websites and books. I do this because I want to extract information from them and not just read and forget it.
The current one is 43folders.com, which is old, but still contains many valuable tips and tricks regarding Mac productivity. I’m unsure if there is anything like that today like the Mac blogging scene was from 2003-2008 – maybe MPU Talk — when everybody was obsessed with GTD, QuickSilver, Mac OS X, and productivity. Good times!
Anyway… I started to archive interesting articles linked on 43 Folders into DEVONthink. Sadly, many of those blogs are no longer around, but archive.org has them saved.

2022.12.26.
Tweaking workflows
-
I constantly tweak my workflows this time of the year. I usually provide tools for others—that’s what I do for a living—but I also have to keep my knives sharp.
-
This year I’m tweaking two things.
-
Take better notes while watching a video.
-
1. I set up a YouTube channel piped into DEVONthink using RSS to download videos automatically.
-
2. I can use DEVONthink’s Annotations feature locally to insert timestamp-specific notes for the video.
-
3. I can export the annotation into Craft and create “permanent notes” in my Zettelkasten.
-
-
Moving my Zettelkasten over to Bike.
-
I like to think about my Zettelkasten being a large outline. Keeping it inside Bike could be beneficial.
-
I’m trying to mimic the analog Zettelkasten (or Antinet).
-
I won’t use an analog one since I like the digital one’s benefits better, but I also want ideas from the analog one.
-
I’m a programmer and I use my Zettelkasten to understand coding concepts. I have some code snippets stored in SnippetsLab, so it’s easier to link to those from my Zettelkasten outline than keeping them on paper.
-
-
I can nest notes under each other.
-
I can easily link notes together thanks to the Bike and Hook integration.
-
-
-
Disadvantages
-
I don’t have backlinks, but I’m not sure I need that inside a Zettelkasten.
-
-
2022.07.02.
Reduce context switches in the OmniFocus Inbox using a Process perspective
I watched a video from Cal Newport on how he uses a simple text file for the sense-making of a bunch of new information. He mentioned that instead of processing his emails one by one, he captures the essence of every email into his text file, then starts to categorize it, organize it by projects, etc. This gave me an idea about solving a similar problem I had with my GTD inbox for a while now.
GTD recommends that we process our stuff in the inbox sequentially, without grouping beforehand. The problem with this approach is that many items related to different projects are scattered in our inbox, so we’re jumping in and out of projects while processing our inbox. This constant context switching drains energy from our brain.
If we want to spare our attention, it is a good idea to group our unprocessed inbox items by project, so we can reduce the context switching when we process them. Using this approach for the GTD Process and Organize steps will ensure that we clean things related to each project in one go, not randomly.
I will show you how to do this inside OmniFocus, but you can also steal this approach for Things using a similar “Process” tag.
Why is this a problem?
The point is to add a temporary structure to information in the inbox. I usually do some form of project planning and next action creation when I’m emptying my inbox. The problem is that I constantly switch thoughts about many different things as I go through each item. It would be nice to have them batched and grouped by their project. This can reduce the attention switching to different topics/projects.
Let’s say we have an inbox like this:
- Item 1 (could be about Project X)
- Item 2 (could be about Project Y)
- Item 3 (could be about Project Z)
- Item 4 (could be about Project X) ← This is where I will have to return to “Project X” again. This item can even be connected to “Item 1” somehow.
I hate when I have to switch my current context (not my GTD context, but the current mindset that I’m in) and go back to a project I already thought about and assigned a next action to; possibly, I even closed its support material since then.
Having new information pre-organized by projects (or topics) can reduce the load of thinking about a project twice or more in an inbox processing session.
Using the Process workflow

- The first step is to create a new perspective in OmniFocus called Process with the rules shown on the screenshot above. You’ll use this perspective to process things instead of the standard OmniFocus Inbox.
- It’s essential to have everything corralled into the OmniFocus Inbox, so you can stop jumping around different inboxes, but more importantly, have everything pre-organized by the project. Go through your inboxes (email, Slack, DEVONthink, etc.) and link a new action to all unprocessed items in OmniFocus. The Hook app can help a lot with this step.
- Open the Process perspective, where you’ll see your unorganized stuff sitting in the Inbox waiting to be pre-organized. You must quickly go through each item and assign it to an existing or new project (don’t assign tags). You don’t have to come up with the final name for a new project. Set whatever comes to your mind; the important thing is to pre-organize unprocessed items in this step. If you don’t know where to assign it, just skip it, or move it into a singular action list related to an area.
- When you have pre-organized everything, you can click the clean-up button (or press Command-K) to see all of your unprocessed items grouped by project. Now you can go through each item and deal with them in the context of its project instead of having them all over the place.
Why having a pre-organized inbox is better than a flat list of unknown stuff
I always get annoyed when I deal with something related to a big project in my inbox, and then 5 minutes later, another thing pops into my view about the same subject. I have to open the project and its support material again, get into the same mindset, and maybe even reconsider everything I figured out 5 minutes ago. It is a dumb way to plan things.
I’ve been pre-organizing inbox actions by the project for about a month now, and I can assure you that having unprocessed stuff grouped by the project can make a big difference. I can process my OmniFocus Inbox about 15-20% faster than before, but more importantly, I don’t feel tired after doing it. I stopped switching contexts for every item; instead, I’m spending more time at the project level and dealing with new things from this perspective.
I wrote a follow-up post to this one answering reader questions about this workflow.
2022.06.14.
Look what I’ve got!
2022.04.04.
Restore old style macOS alerts
Do you prefer the old style macOS alerts? There is a way to get them globally for AppKit in Big Sur and Monterey.
Open Terminal and paste:
defaults write -g NSAlertMetricsGatheringEnabled -bool false
If you want to restore it:
defaults delete -g NSAlertMetricsGatheringEnabled
2022.03.21.
neilsardesai/Manila: A Finder extension for changing folder colors:
Manila is a Finder extension that lets you change the colors of your folders from the context menu.
2021.12.22.
Using an old MacBook Air for a home server
I just assembled this temporary home server “rack” with my 2018 MacBook Air on top.

It does the following things:
- General file sharing and project archival
- Backups my iCloud Drive and Photos to a Time Capsule
- Runs Time Machine server for my M1 MacBook Pro
- Tests Rails code against Intel via a local GitHub runner instance
- Processes files via DEVONthink smart rules
- Schedules some of my RSS feeds which are published via Feeder
- Archives my websites using rsync
- Filters my email via Mail rules
- Keeps my Reeder queue up-to-date
- Content caching
- Local device backups for my iPad Pro and iPhone
- Media server based on the Apple TV app and Home Sharing
- I don’t care about Plex.
- Torrent server to acquire the latest Linux ISOs
- Connects my DYMO labeler, because it caused kernel panics on my M1 MacBook Pro
I plan to get a proper Mac mini after we moved into our new house, but for now, this is more than sufficient.
2021.11.08.
Absolutely nothing is enabled with this Focus.

2021.04.13.
Apparently you can safely use Typinator with iCloud Drive as well. I’m syncing snippets for about a year now without any issues.
2021.02.23.
Testing Craft for my Zettelkasten with external folders
Yesterday I installed the latest version of Craft. I waited for iCloud sync because I’m very conservative about where I sync my stuff, and Craft only had its sync server.
The update released yesterday makes it possible to add external folders from iCloud Drive or even offline folders. It is a start, although I was expecting full CloudKit sync, not just an external folder.
It still has some issues and bugs related to syncing. I migrated my Zettelkasten from DEVONthink to Craft; it has about 150 notes right now. I installed Craft on all of my devices, and I’m still experiencing sync errors.
It seems like Craft is stuck in a state where it stops updating files from the iCloud Drive folder I set as a space. I have to reload the folder every time I change something, which is annoying.
The app itself is lovely, way better to use for Zettelkastens than DEVONthink on iOS. I like the initial experience, but syncing problems doesn’t make me trust in the app. I saw the developers are responsive and fix stuff quickly, so I’m hopeful. Until then, I keep testing Craft and see how it will change my habit of writing into my Zettelkasten.
2021.01.31.
Aqueux — Dynamic wallpapers based on a classic
A really nice remake of the classic Aqua wallpaper.
2020.09.23.
Enabling the Debug menu in Safari 14 on Big Sur and Catalina
Nekem alapvetően nincs problémám a Safari tabkezelésével, nem úgy mint a linkelt posztban Dan Morennek, de a Debug menü engedélyezése önmagában is érdekes lehet. Van jópár olyan opció ebben a menüben, amit mi nördök valószínűleg tweakelni fogunk.
2020.07.29.
Google Site Search Service
Már régóta idegesített, hogy az iOS-en oly sokat használt Site Search shortcutomnak nincs macOS megfelelője, úgyhogy ma reggel összeraktam Automatorben. Mindössze annyit csinál a cucc, hogy adott weblapon elindítva megkérdezi mire szeretnék rákeresni, majd megnyitja a Google találatokat egy új Safari tabon az adott oldalról.
2020.07.07.
Shrugs.app
Miután az új csapatban Slacket használunk kommunikációra, így megint felmerült a hivatalos Electronos kliens, amit nem vagyok hajlandó használni – akkor inkább megnyitom Safariban. Szerencsére most jött velem szembe a Shrugs app, ami egy egész pofás natív Slack kliens Macre.
Ezt a screenshotot pedig csak itt hagyom a poszt végén.

2020.06.26.
Elképesztő, hogy ezzel az “attention to detail” tudással hogyan sikerült megrajzolni azt a kotonalakú akkumulátor ikont macOS-en.
2020.06.25.
Megnéztem a Big Sur bétát. Elsőre sokkal előrébb van, mint az iOS 7 volt, de az ikonok árnyékai miatt valakit seggbe kellene rúgni az Applenél. Az ablakokból hiányzik a kontraszt – sok a fehér — és nem egyértelmű melyik aktív.