2023.12.07.

Using iA Writer as an end-to-end writing system

I’m a long-time Ulysses user, and I appreciate it since it’s a great Mac citizen, but I’m moving towards more open formats and possibly keeping more of my raw source files in Git.

I started using iA Writer a couple of months ago for my Zettelkasten writing, and having it as a backbone of my Jekyll site turned out to be great. On the other hand, I still kept my writing workflow in Ulysses, especially for long-form writings. I just wrote about how I use Ulysses projects in my writing workflow.

I wonder if having iA Writer as my only writing app is beneficial. I start to think it is, so I’ll discuss that in this post.

Keeping my writings in a Git repository

Git should be used by more people, not only by developers. It is a powerful system for keeping track of changes in a project, and it’s easy try out new ideas by creating new branches.

Git is made for text, so keeping writings in a repository is a natural workflow. For me, it’s new, though; I always used some form of library-based app for managing my writings where you can export the final product, but the raw material is usually kept in a proprietary database or file format.

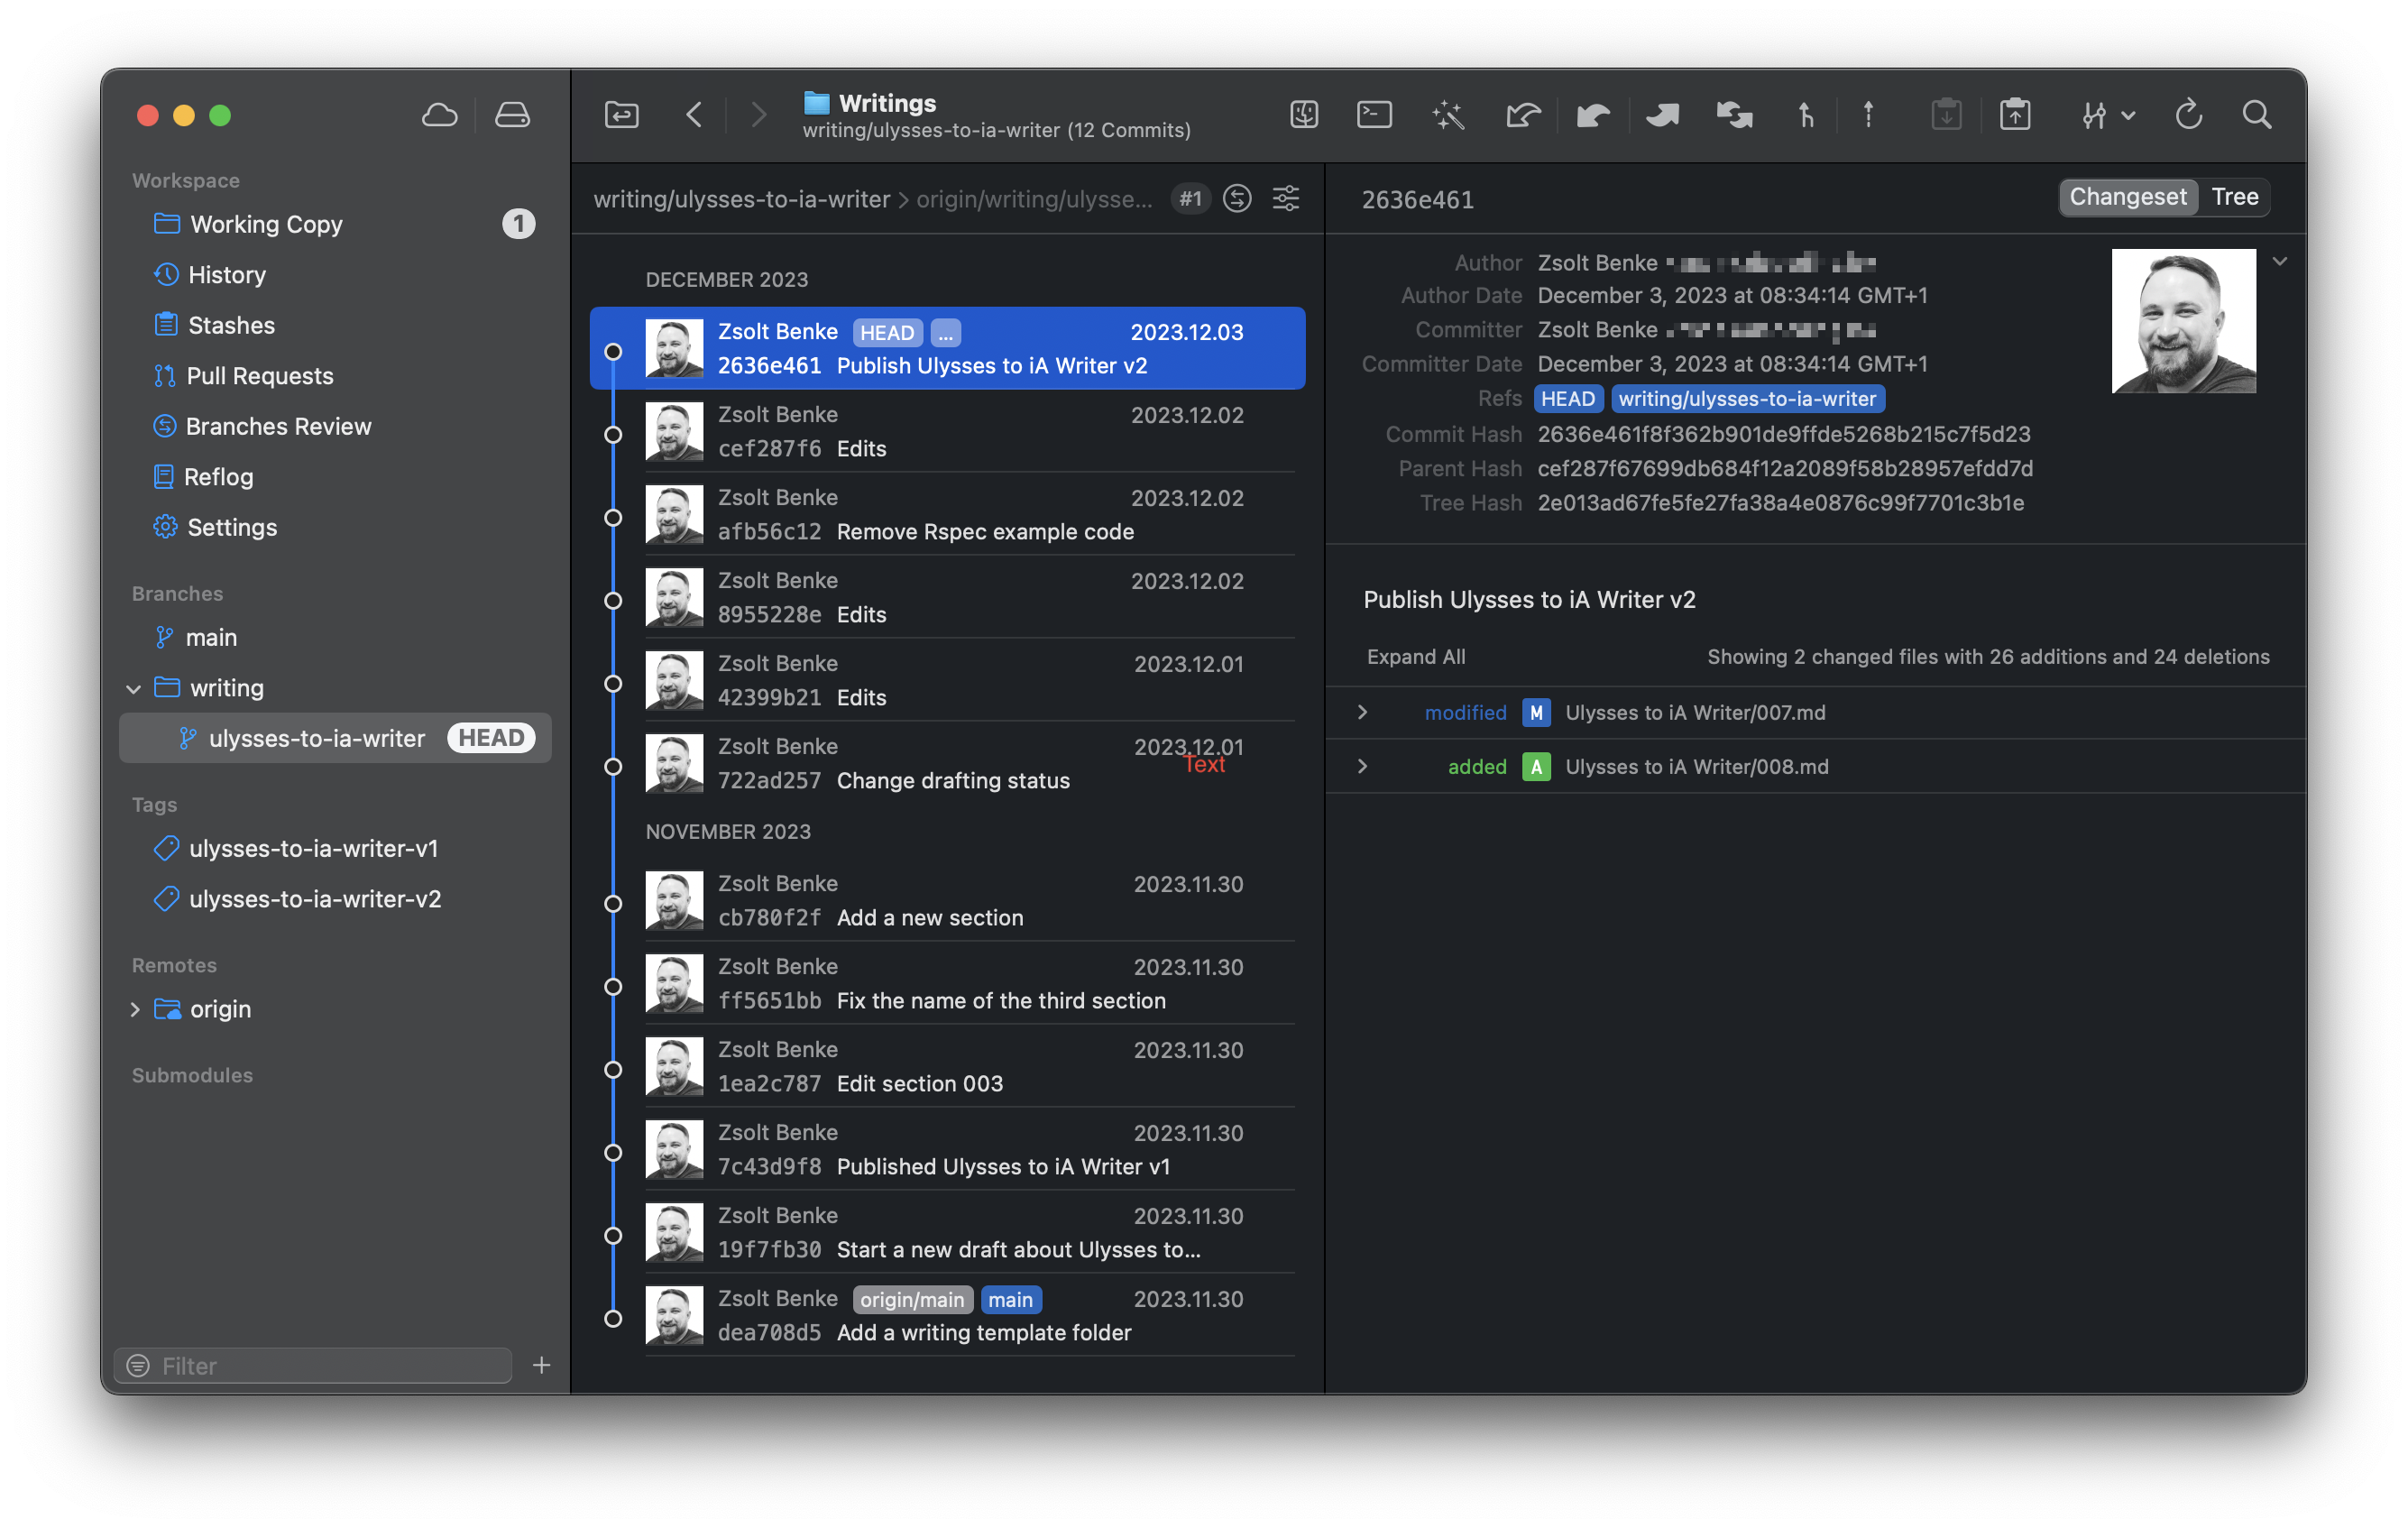
iA Writer, on the other hand, uses standard text files – specifically Markdown files – and keeps them in the file system, so we can store our files in Git repositories, which can be edited directly as folders in iA Writer. I use Tower on the Mac and Working Copy on the iPad to manage all my Git repositories and to commit my changes.

The beauty of keeping my writings as simple text files is that I can work on them using multiple apps (even in Ulysses). I like the idea that I can write in iA Writer and edit my documents later in MacVim/ iVim or BBEdit. Different text editors are made for various purposes so that I can use the best one for the task. There is no one-size-fits-all.

Keeping my Markdown files simply in the filesystem, I can also capitalize on other tools like Tmux for managing Vim sessions; using it, I can even write in the Terminal (the original distraction-free writing environment) and have access to multiple panes.

Git is also an open system so I can push changes to any standard Unix-based server over SSH. Keeping my writings up-to-date between devices is not automatic but pretty straightforward to do.

Using Git for marking milestones

In Ulysses, I had this milestones-based workflow where the main writing group in the project got manually duplicated.

  • I kept groups where all sections were sheets, then duplicated these groups before significant edits and assigned version numbers for each group, like v1, v2, etc. These names had no meaning other than having a version number for the group.
  • The triggers for duplicating groups were the following:
    • Collected and sorted my Zettelkasten notes.
    • Finished the first draft.
    • Checked the grammar with Grammarly (which is just another form of editing).
    • The final version before publishing the post.

Since I can use Git directly with iA Writer, I no longer need to duplicate groups manually. I can use Git to keep the history and mark important milestones.

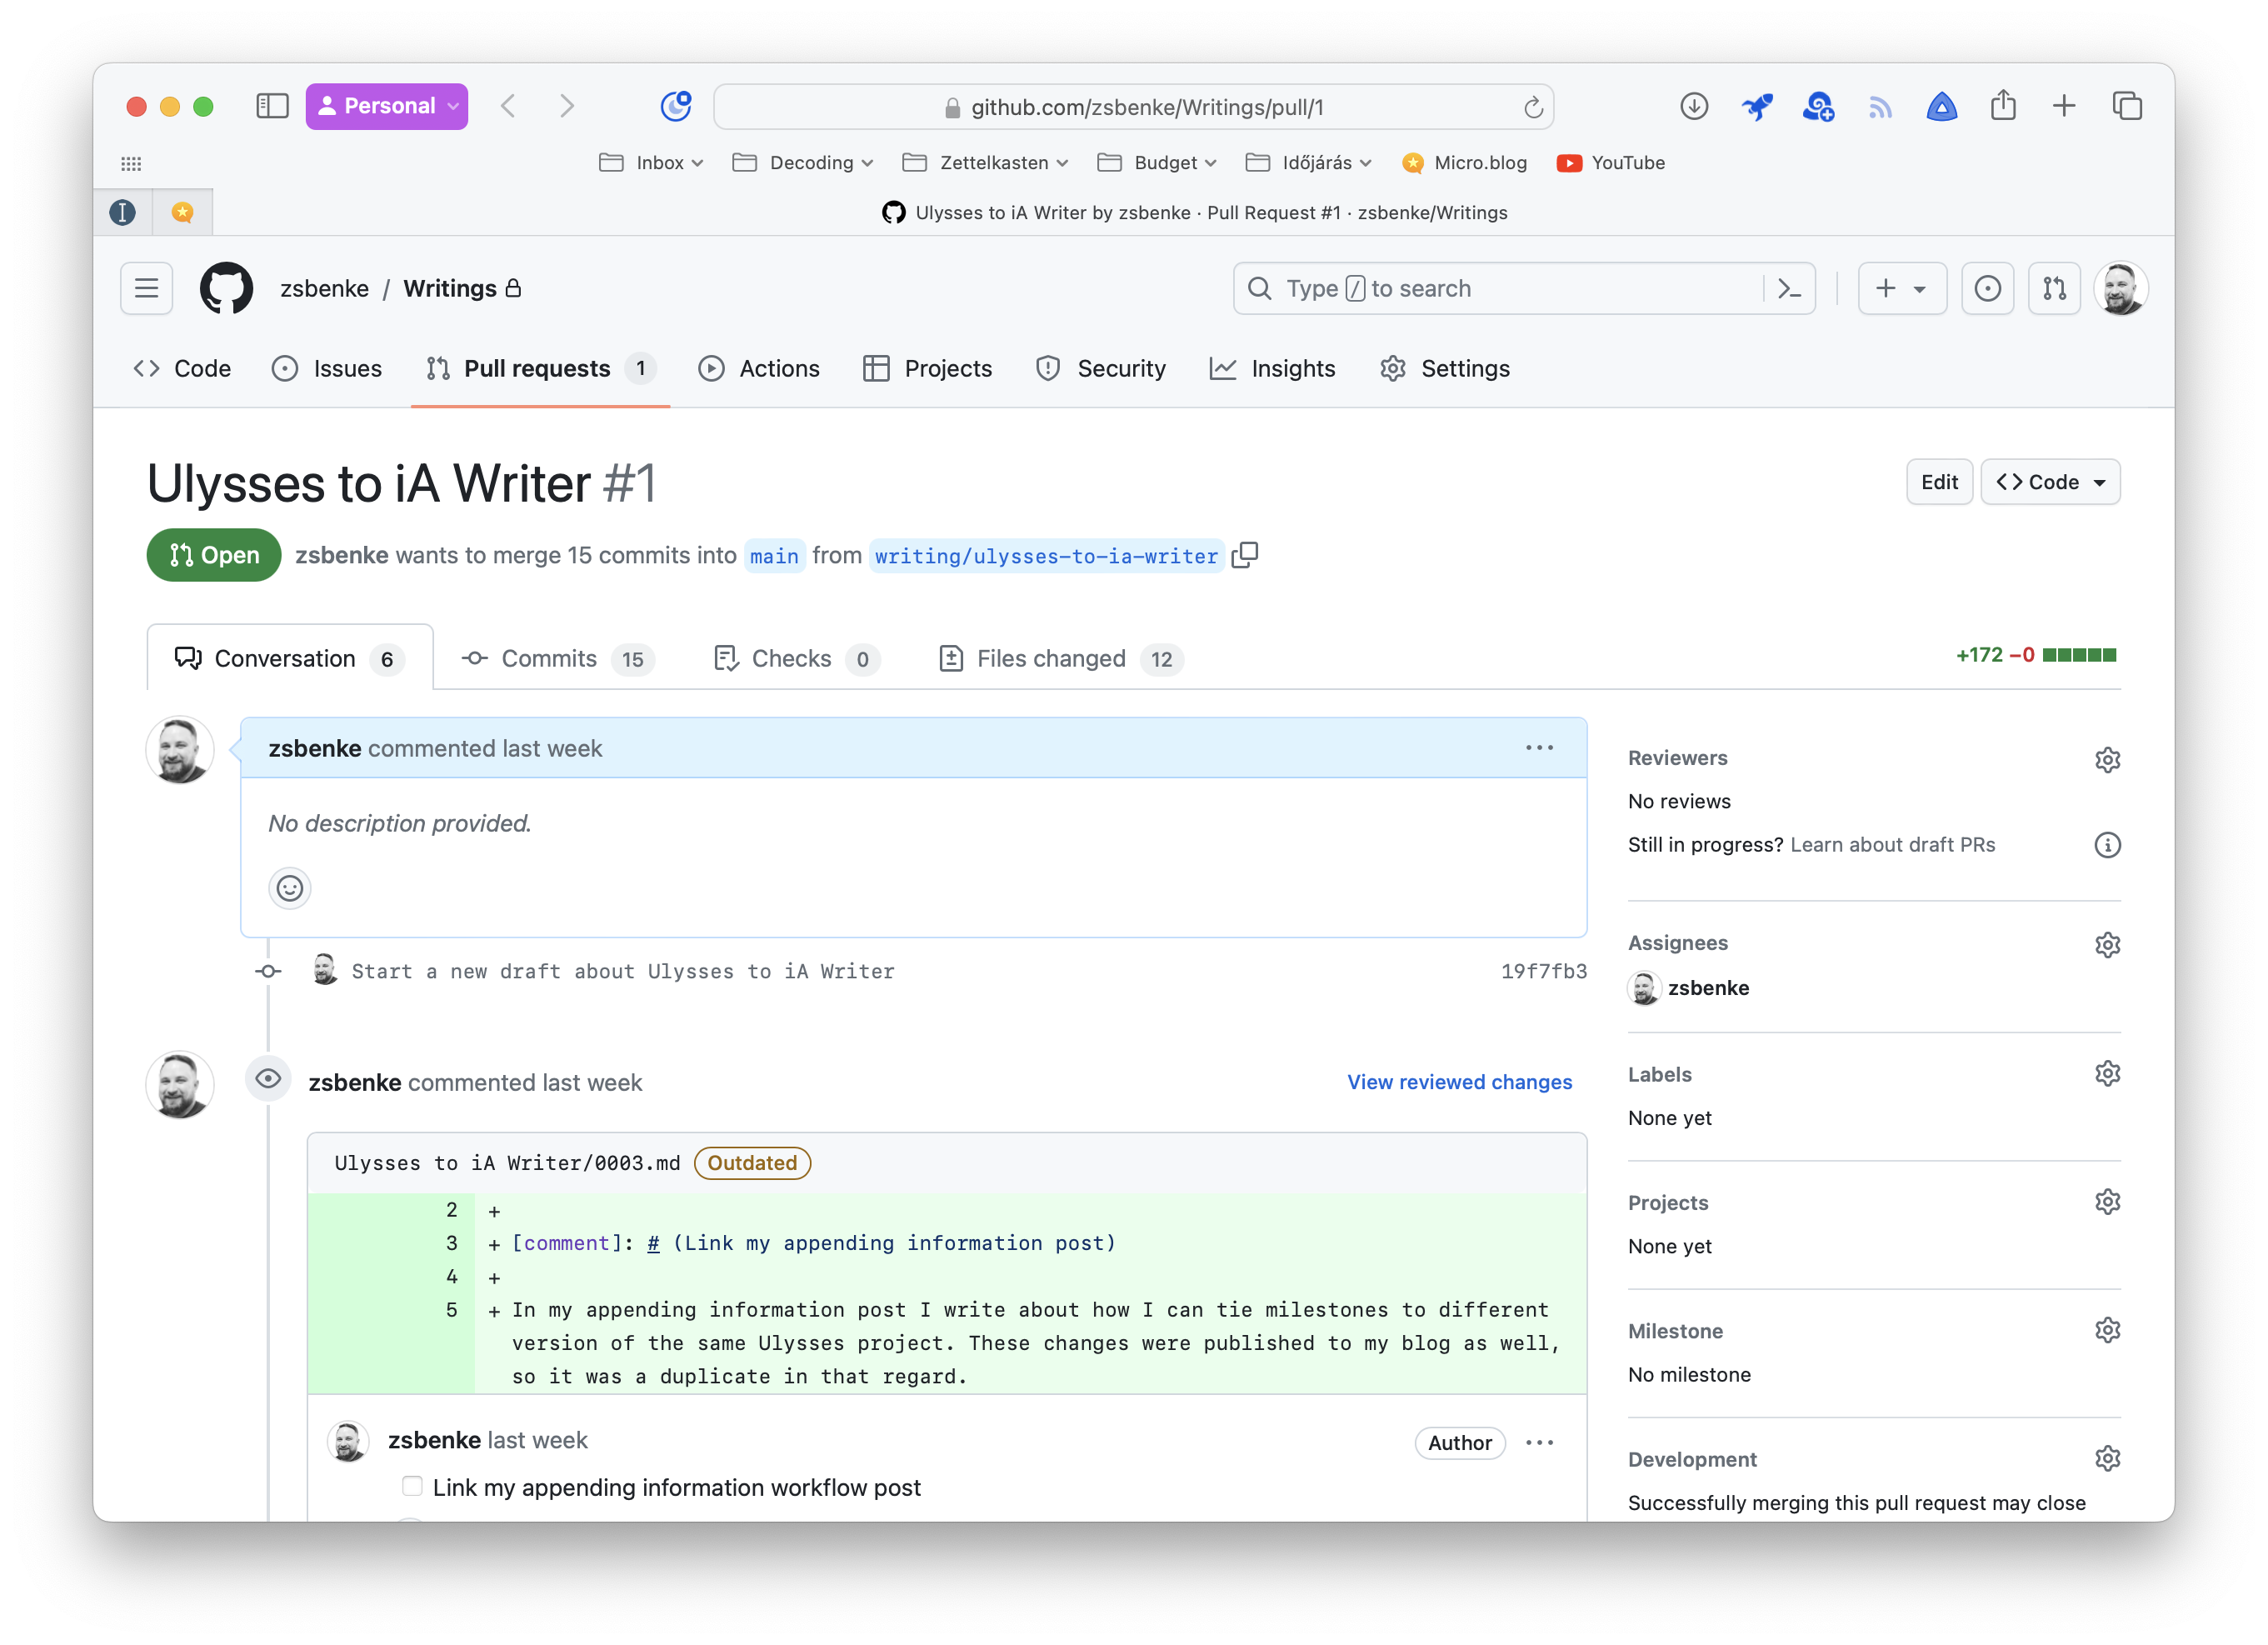
Keeping history in Git is pretty straightforward: I can commit my changes and have a version history on every file. I can create branches for each writing project, so my main branch only includes finished and published content. This is not that important since all of my posts are siloed into separate folders, but I still keep pull requests open for each article to comment on and see the history of changes in a nice interface.

Pull requests also mark a project’s start and end at the point of opening and merging. This is more of a psychological benefit I like to have: I feel a sense of accomplishment when I finish a project and merge it into the main branch.

Managing milestones is done through Git as well: I commit in Git that I "Published XYZ v1" or "Published XYZ v2", and then optionally, I tag these commits to mark the end of a milestone.

iA Writer can also publish my writings directly to my blog; this can be used as a marker when I reach a writing milestone. There is no need to duplicate anything locally, but I can export a manual version and keep it published as a hidden post on my blog if I want to return to a previous idea I removed.

I call these posts seedlings, and they aren’t visible in any listing, but they have a direct link, which I can use to preview how the final post will look on my blog.

I created seedlings as a tool primarily for gathering feedback from others on a document. It is my homegrown collaboration feature, which uses my site, where I’m entirely in control of my content. I can publish a hidden post, and then people can leave comments as feedback so we can collaborate without external tools.

But most of the time, I "collaborate" with myself, so I’m leaving comments on my seedlings as notes, which can be migrated back to the actual draft.

Creating pull requests for writings

GitHub pull requests are powerful tools, not just for coding but for writing, too. As I develop my writings, I can keep track of them in separate branches and associated pull requests in my Writings repository.

Pull requests allow me to annotate my text files with comments, which can serve as a built-in to-do system for my writing projects. There is a similar feature is built into Ulysses, where I can have annotations and notes on a sheet, which is one of the benefits of having a library-based app backing my raw content.

On the other hand, using open formats makes using different tools for different jobs on the same content possible. So, in this case, pull requests can be used as an annotation and journaling system around the post I’m writing. When I’m done, I can merge the PR into the main branch as I do in my software development workflow, then publish the final article on my blog.

Writing in the Terminal

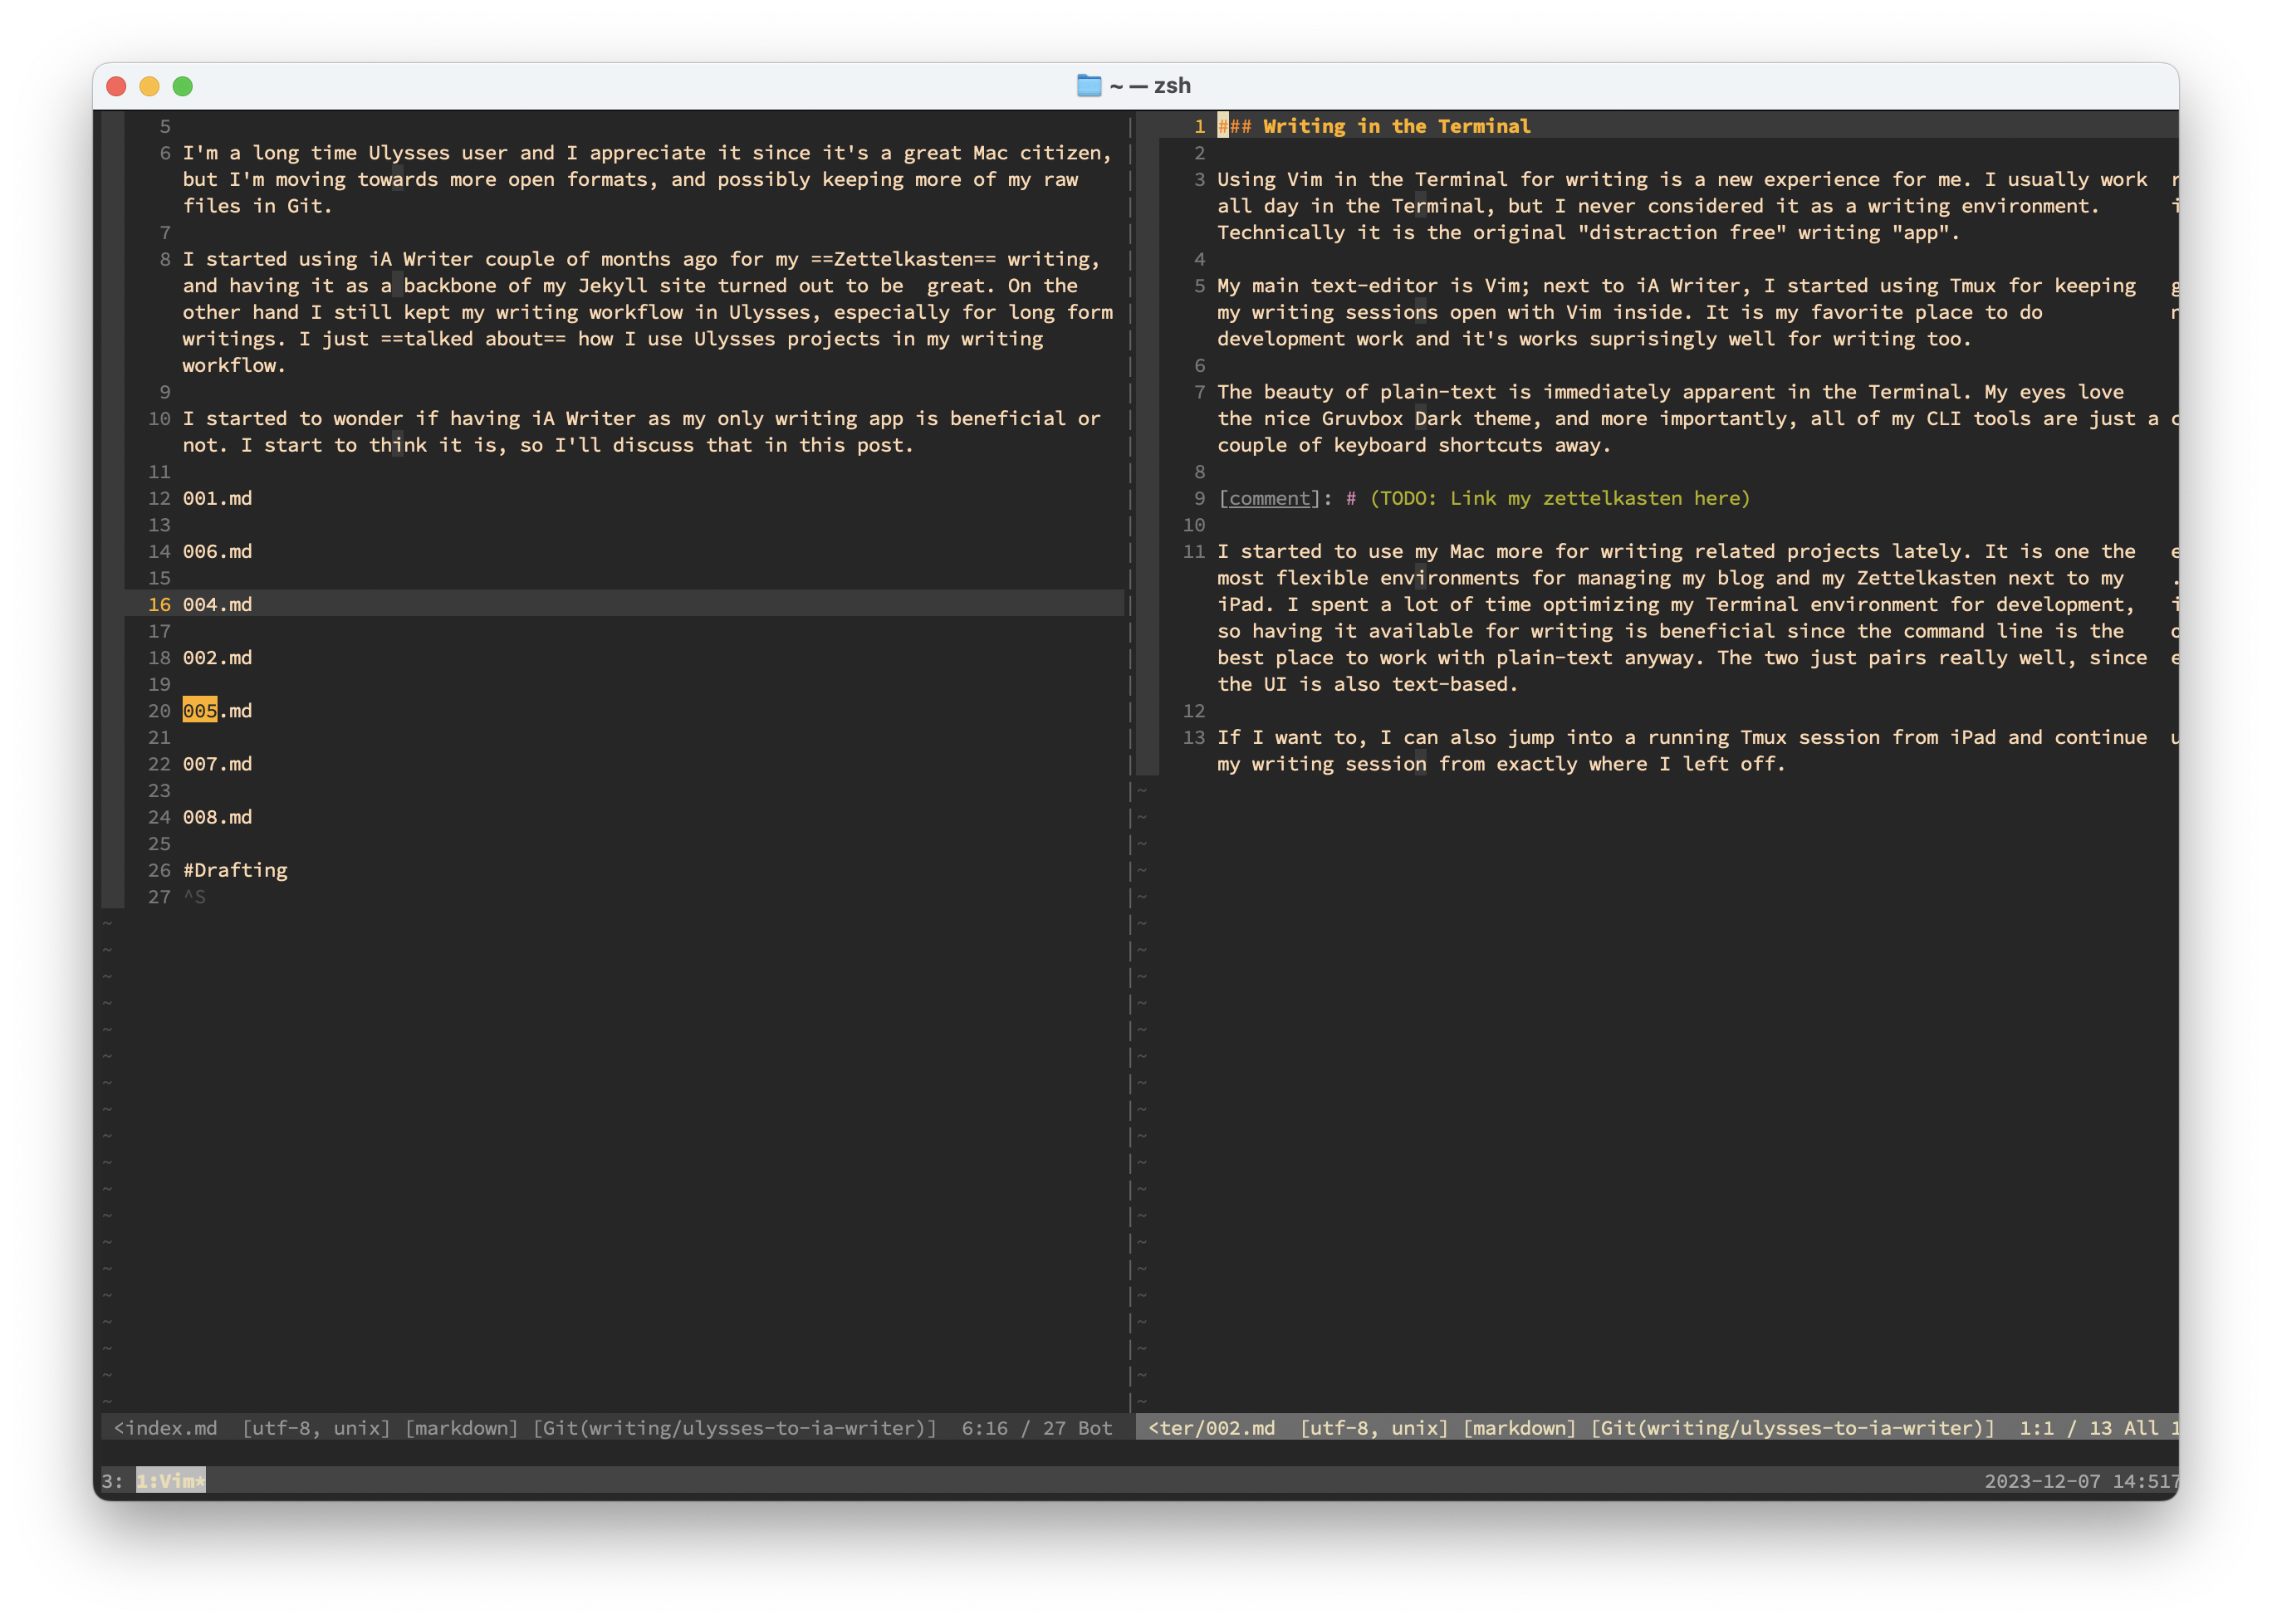
Using Vim in the Terminal for writing is a new experience for me. I usually work all day in the Terminal, but I have yet to consider it a writing environment. Technically, it is the original "distraction-free writing app."

My primary text editor is Vim; next to iA Writer, I started using Tmux to keep my writing sessions open with Vim inside. It is my favorite place to do development work and works well for writing projects, too.

The beauty of plain text is immediately apparent in the Terminal. My eyes love the nice Gruvbox Dark theme, and more importantly, all of my CLI tools are just a couple of keyboard shortcuts away.

I’ve started to use my Mac more for writing-related projects lately. It is one of the most flexible environments (alongside my iPad) for managing my blog and my Zettelkasten. I spent a lot of time optimizing my Terminal environment for development, so having it available for writing is beneficial since the command line is the best place to work on any plain-text project – the two just pair really well since the UI is also text-based.

I can also jump into a running Tmux session from my iPad using Blink and continue my writing session from where I left off.

Section-based writing

In Ulysses, I used sheets for every section. I don’t have sections in iA Writer, but I can have separate Markdown files and include them as content blocks. Content blocks are not a standard Markdown feature, but they are so easy to work with that I’m fine if other apps don’t support them.

Sections are numbered and represent a sequence. When I want to create a new section, I add a unique number in the sequence. I name my sections 001.md, 002.md, 003.md etc. This workflow is similar to how Stephen Wolfram manages his notebooks in project folders: he creates a new file in the folder and starts writing.

I have a bunch of other conventions too. When I’m doing designs, I’ll typically keep my notes in files with names like Notes–01.nb or SWNotes–01.nb. It’s like my principle of not having too many file categories: I don’t tend to try to categorize different parts of the design. I just sequentially number my files, because typically it’ll be the most recent–or most recent few–that are the most relevant when I continue with a particular design. And if the files are just numbered sequentially, it’s easy to find them; one’s not trying to remember what name one happened to give to some particular direction or idea.

A long time ago I started always naming my sequential files file–01, file–02, etc. That way pretty much any sorting scheme will sort the files in sequence. And, yes, I do often get to file–10, etc. But in all these years I have yet to get even close to file–99.

I see this workflow being similar since writing projects can contain other types of assets, not just Markdown. Markdown files in iA Writer can also include code blocks, which can be stored as separate files. Think about that for a second.

Separate code snippets mean I can run these files directly in the Terminal using Ruby, Swift, or any other CLI tool. This gives me an interactive thinking space for code, like outlining, journaling, or mind-mapping. We have interactive notebooks in different environments, but I can make my writing projects similar with automation. It can be a great way to test and document code.

Let’s say I’m working on a new software project: I can have a docs folder that contains Markdown files linking to external sources in the actual code. Additionally, I can use iA Writer to embed source files as content blocks. When exporting the final version, source files are converted to Markdown code blocks in the output document.

Section-based writing also allows me to work on any part of the text at any time. This is a more natural bottom-up approach that is better than trying to fit my writing into a linear flow, where I start my post with the intro and then write the rest from top to bottom. Writing is the act of trying to fit random ideas together into a final story arc.

Using iA Writer Authorship for marking Zettelkasten notes

One of the main reasons I want to keep all my writing in iA Writer is their new Authorship feature.

It was intended to mark content pasted from other authors or generated by AI, but I want to hack around its intended purpose by marking text that was added from my Zettelkasten differently.

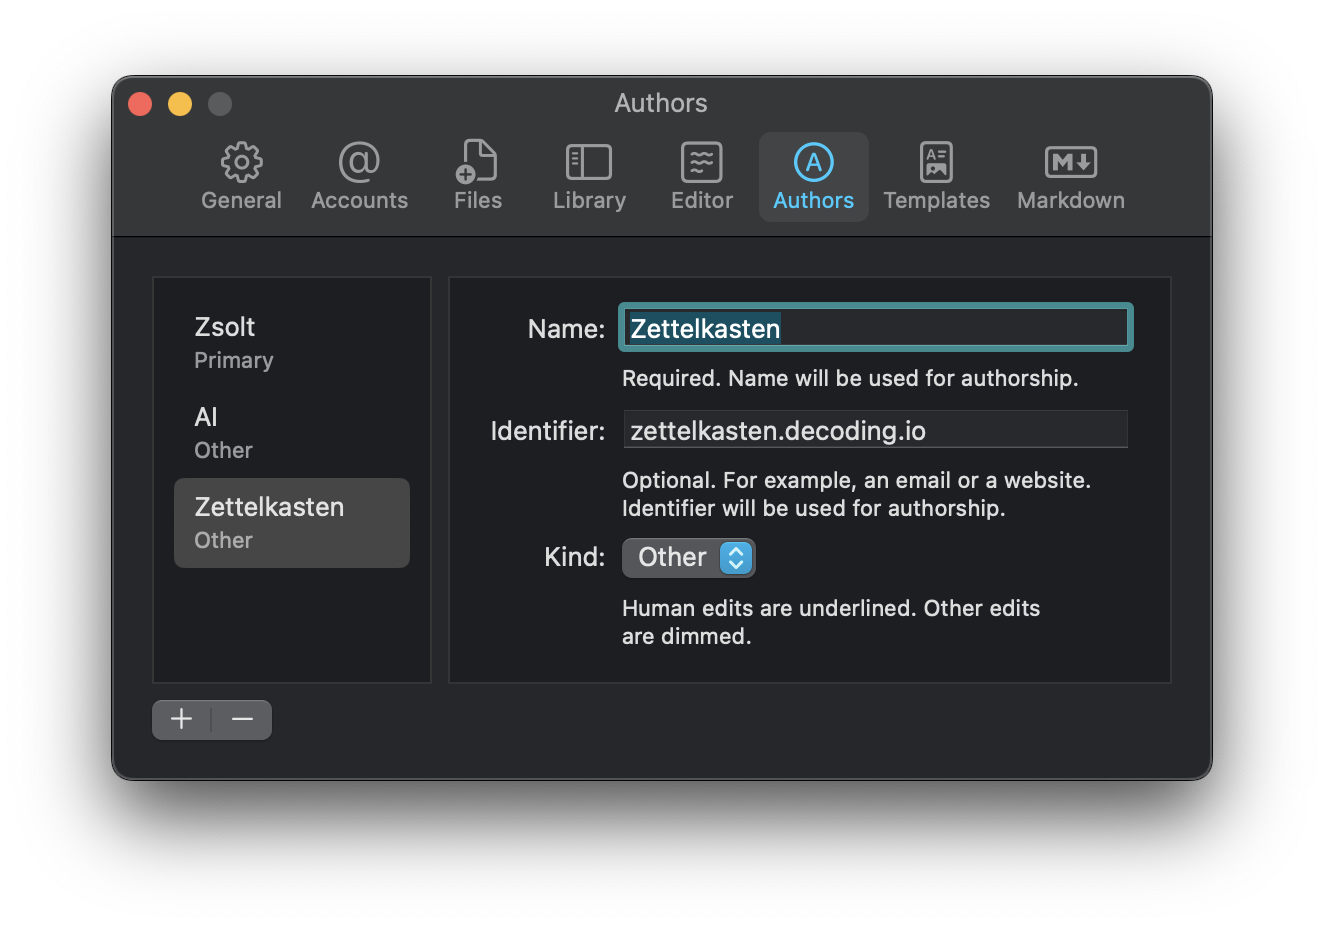
Since I mainly edit my Zettelkasten notes in iA Writer, using the same app as an end-to-end workflow for my final writing projects makes sense. I can switch between my notes and writings and copy and paste text into my drafts. Here’s where the Authorship feature comes into the picture. Since I can paste my Zettelkasten notes as text acquired from other sources, iA Writer would mark these paragraphs in a different style. I actually like this since edits are clearly visible over my original Zettelkasten text.

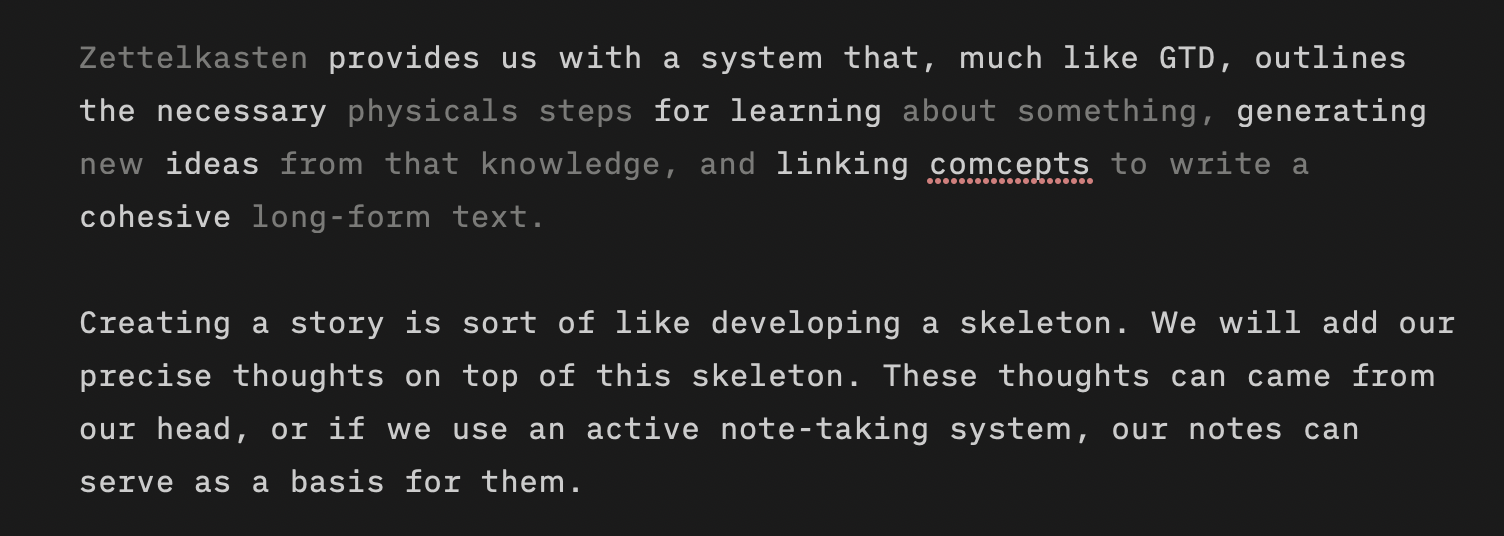
I have a global Authorship setup in my iA Writer settings, where my Zettelkasten is marked as "Other." This feature was intended for text copied from text-related AI apps, but if you think about it, my Zettelkasten is a "thinking partner," according to Luhmann, so in that sense, marking it as authored by "Other" sources makes sense.

Zettelkasten provides a system that, much like GTD, outlines the necessary physical steps for learning about something, generates new ideas from that knowledge, and links concepts to write a cohesive long-form text.

Creating a story is like developing a skeleton. We will add our precise thoughts on top of this skeleton. These thoughts can come from our heads, or if we use an active note-taking system, our notes can serve as a basis for them.

When we use these notes, we still have to form them in a way that makes sense in the context of the current story. The Authorship feature lets me highlight the differences between a piece of text that is just a source of a draft and the actual text I edited.

Since most of my articles contain notes developed in my Zettelkasten, I want to see these differences. Visually getting a difference between the original note and the edited version makes sense. It lets me visualize the differences between texts from other sources or texts I’m actively writing.

Using iA Writer as an end-to-end writing app

As I mentioned, I’m editing my Zettelkasten in iA Writer. I’m also editing my writings in iA Writer. How about including AI in the same app as well?

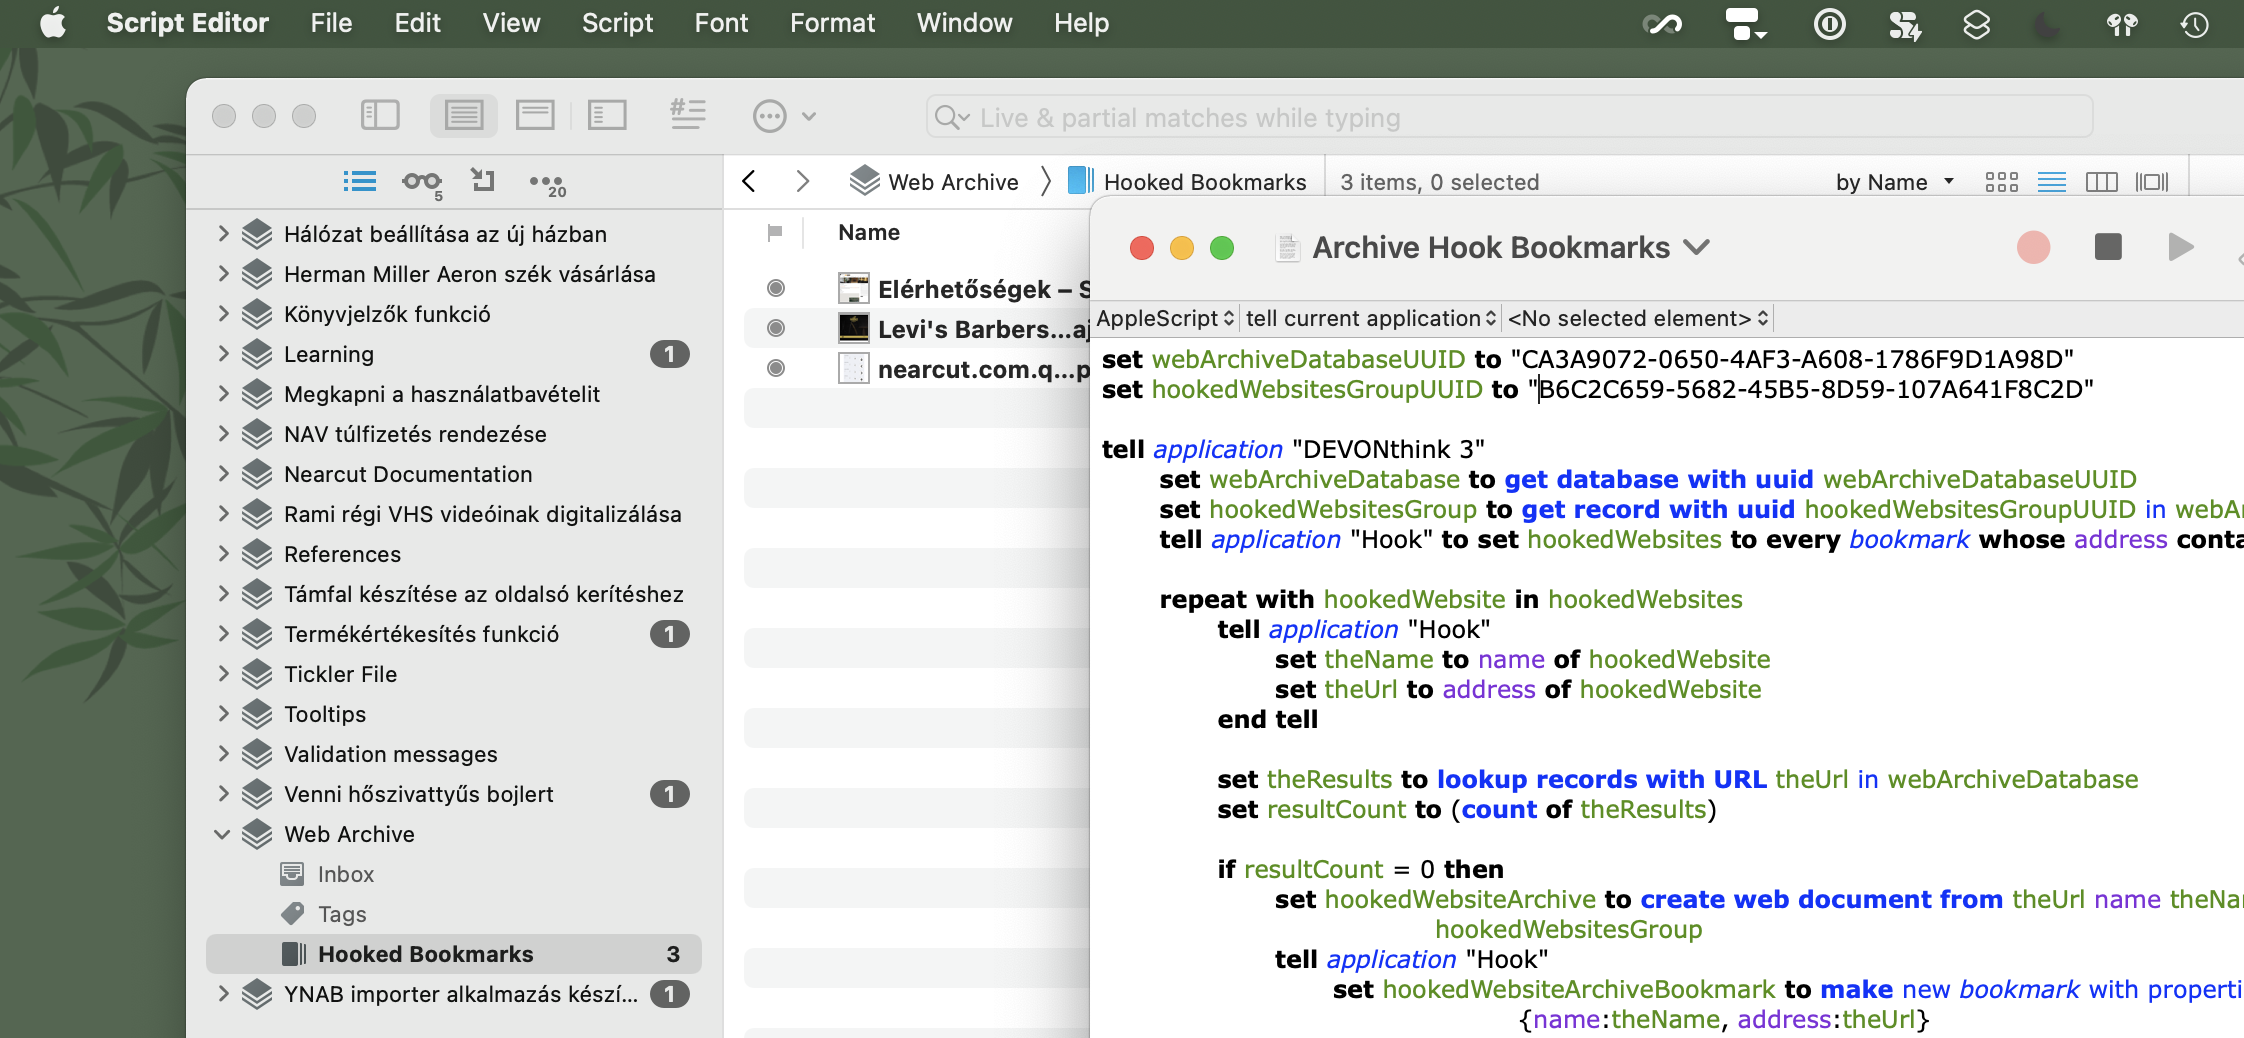
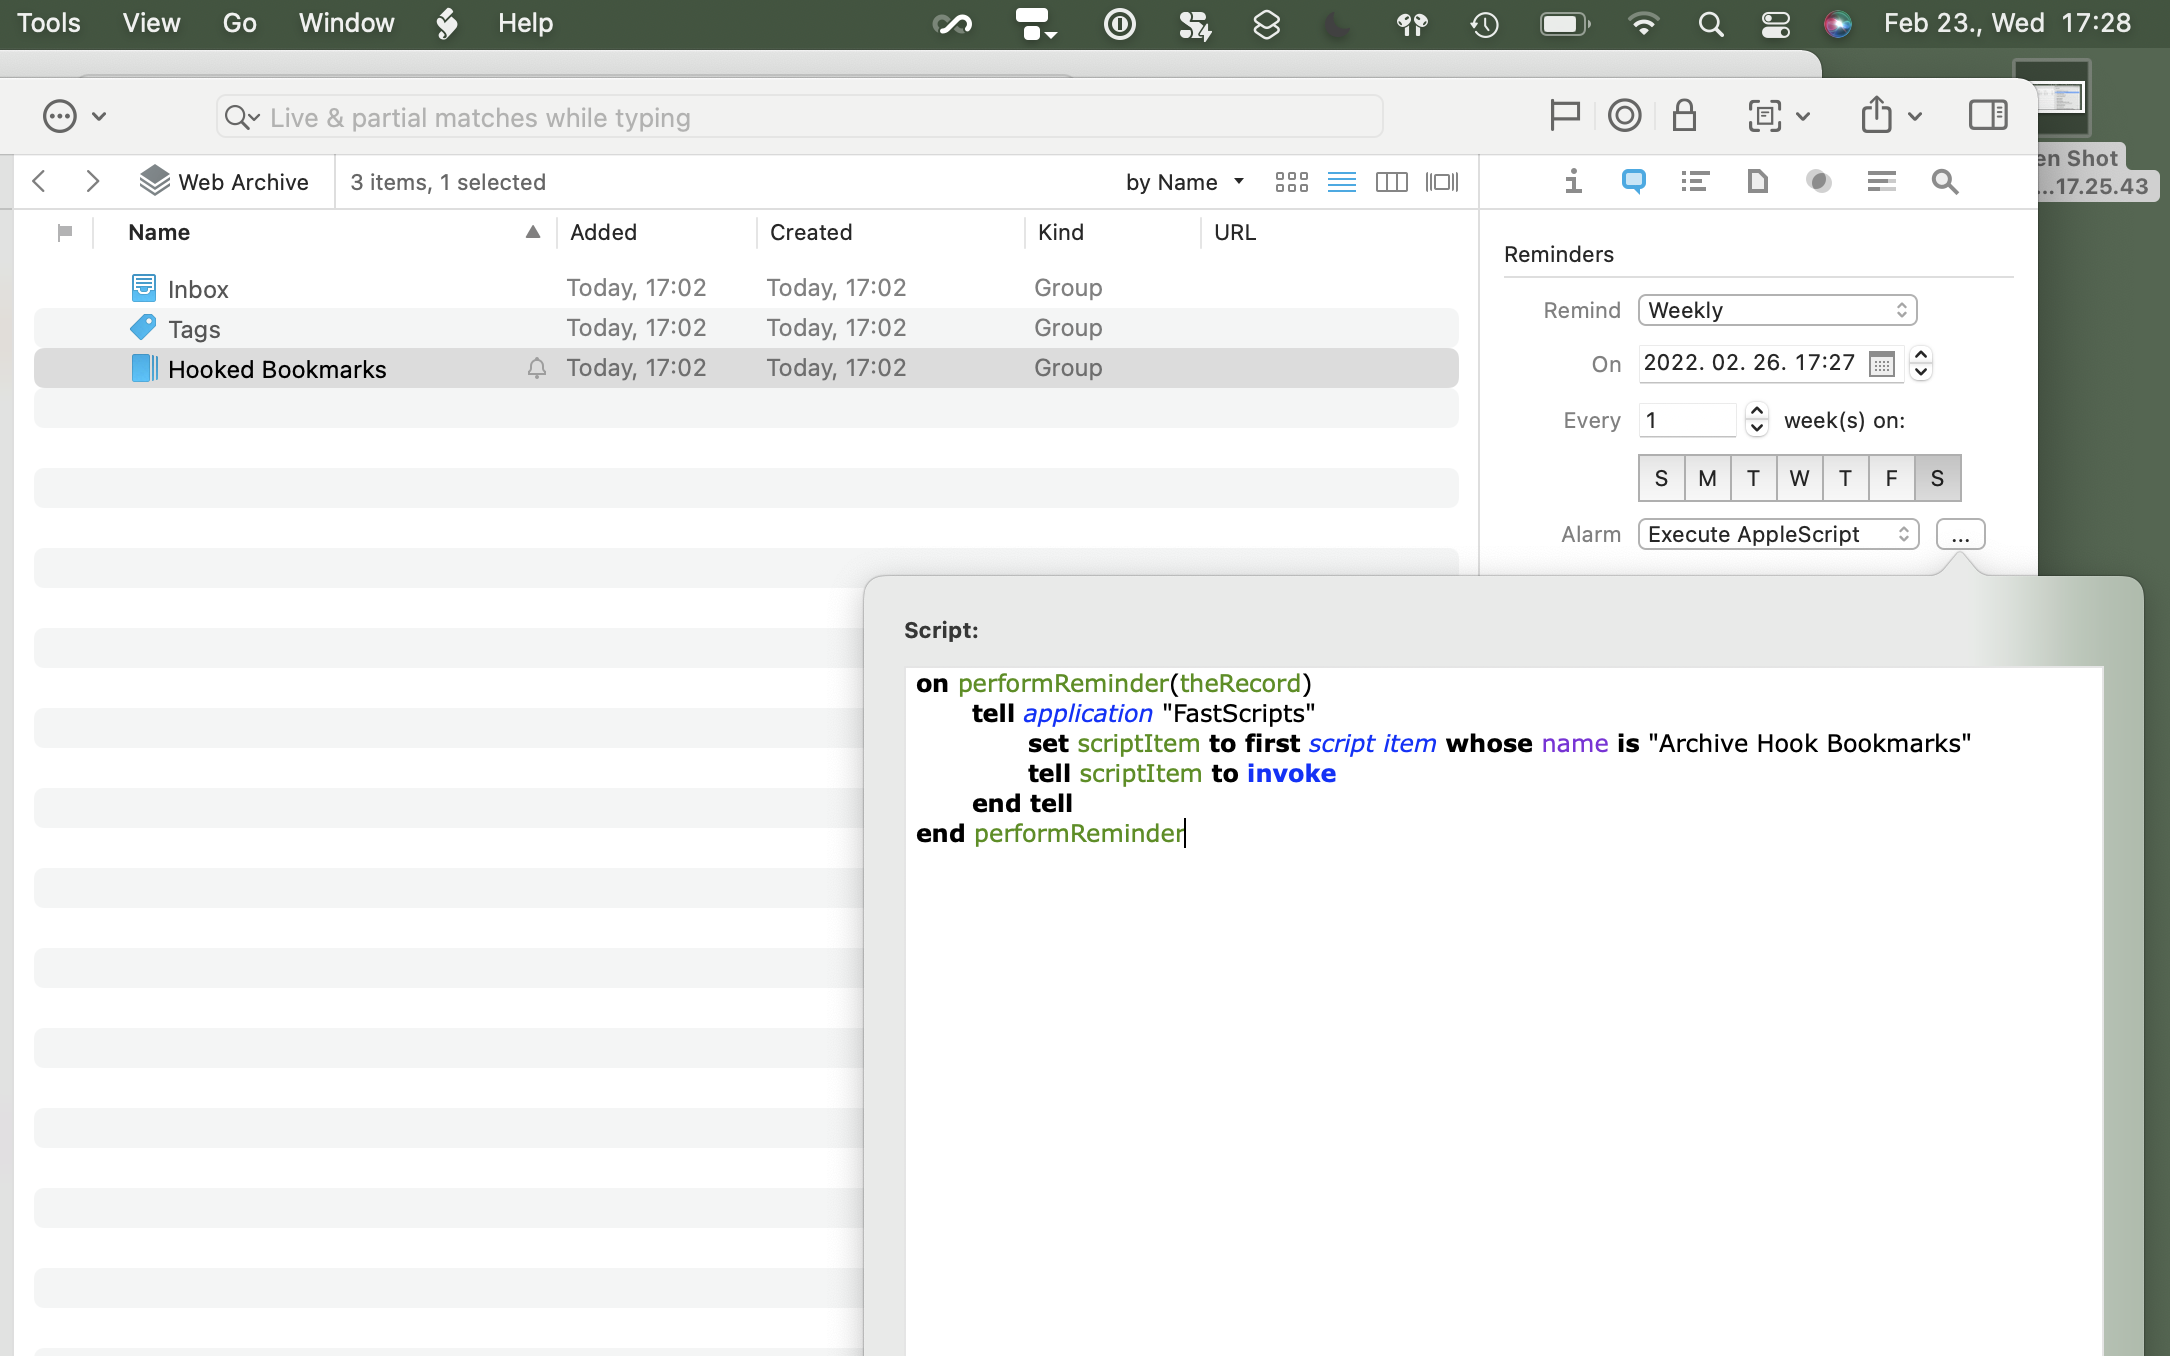
I developed a tool a few months ago called RubyGPT, a Ruby gem that lets me use ChatGPT in the Terminal. I also integrated it into iA Writer using Apple Script so I can have an ongoing ChatGPT chat session saved into a Markdown file. These chat sessions are stored in my ~/Documents/Chats folder, which is also added to my iA Writer library. Sadly, this tool only works in macOS, although I can export ChatGPT chat sessions from Drafts, too, where I’m using this action to have a similar workflow.

All my writing-related plain text lives inside iA Writer, so I consider the app an end-to-end tool for all my writing needs. In theory, I can do this with Ulysses, too, which can also work on external files, but iA Writer doesn’t hide the Markdown syntax, so I can see the original text as John Gruber intended.

With the Authorship feature, I can also see the changes I made to externally generated text, regardless of whether it’s coming from an AI source or my Zettelkasten. I still have to do the work and edit this text into a proper post.

I love this integrated workflow of starting with reading, having highlights processed into notes, getting these notes under control, and then using them as the building blocks of my posts. This workflow lets me naturally develop ideas and use them in places where they make sense.

No need to force anything.

I can write about whatever I feel like at the moment.

2023.11.23.

Reviewing append-only workflows

There are multiple systems where you can only append new information at the end of the chain. There is no chance to modify the history in these workflows (or it’s very convoluted).

But why is it beneficial to use an append-only workflow? I’ve been fascinated by these systems lately since we can learn so much about our workflows by keeping previous states around.

The core idea of an append-only information storage system is to only add new information without removing existing data, which has excellent benefits: we can see ideas getting developed, we can keep versions of a file, or we can capture information for the historical sake of it.

Analog systems like the Antinet Zettelkasten or the Bullet Journal force us to organize information by appending it. Digital systems can be used like this too, but they need the right mindset from us so we don’t remove mistakes.

In this post, I’ll discuss using email, Zettelkasten, and Git in the append-only information organization context.

Email is a popular workflow for developing ideas

In essence, idea development leverages the fact that you rely on the history of the idea as you progress it. Its history serves as a breadcrumb to go back in time and see how it was developed.

Drafting something is a long process, and the most apparent tool some people use is email. It can be a great append-only note-taking tool and storage medium. Here’s an excerpt from How I use append-only log to store information:

If you are working on a piece of text for a long time, you can just keep it as a draft and keep working. It will be auto-saved.

I am a fan of the bullet journal method. Handwritten text is immutable. The same goes for emails. Once you send it, it becomes immutable.

To show another example of how email can be used for drafting, here’s how Steve Jobs used email to write his Stanford commencement speech:

In January 2005, John Hennessy, the president of Stanford, asked Steve to give the commencement address to that spring’s graduating class. Steve agreed.

On and off for the next six months, Steve took stabs at writing his talk. He emailed stories and memories to himself. He asked friends, Apple colleagues, and the screenwriter Aaron Sorkin for their thoughts. In the end, however, he wrote the speech on his own. Even three days before the event, Steve was unsatisfied with his talk. He sent it to a friend, warning, “I’ll send it to you, but please don’t puke. I never do stuff like this.” He was still refining the speech the morning that he gave it. Uncharacteristically, Steve read from the lectern, rather than memorizing his text (as he did with Apple keynotes) or speaking extemporaneously from a few scrawled notes (as he did in nearly every other talk).

Steve was happy with the speech—he emailed himself a copy a few days after giving it—but he generally deflected the praise that he received for it. “I bought it on CommencementSpeeches.com,” he joked to one person. The commencement address has been viewed millions of times online and is included[…]

Steve Jobs once mentioned that he constantly sends notes to himself in his inbox as a reminder. This process is similar to the capture method used in Getting Things Done (GTD). However, GTD does not address how we can use our inboxes to develop ideas further.

Using our email Inbox effectively to develop ideas

Sometimes, I also use email to develop ideas in my inbox during the GTD capture phase. Although I think there are better tools for this – like Drafts or my Zettelkasten – some conversations are present only in email, so I can leave notes for myself in a thread by starting a reply to a message and sending it to my address. This workflow feels like a poor man’s version of HEY’s sticky notes.

I have a separate “Inbox” contact card saved with the +captured text appended to my email address (someone+captured@domain.com), so when I want to remind myself about a message, I’m emailing ideas to this address and use the conversation view in Mail to develop them further by replying in place.

I can also schedule these messages, which act like an integrated Tickler File. I can leverage that Mail has an excellent conversations view, so the Send Later feature can resurface any thread when I’m scheduling a forwarded message to myself. It will reappear in my Inbox with the whole conversation, which gives me the context to figure out what the note is about.

A quick aside about Remind Me and Follow-up in Mail: We have features in Mail in iOS and macOS that could be useful for emailing follow-ups, but they have two problems.

  1. Remind Me only works for emails in the inbox, so if I archive an email, it silently moves it to the top of the Archive mailbox which is useless.
  2. Follow-up is a black box driven by “AI,” and there is no way to set it up manually for specific emails that I want to track.
    • It uses three days by default, but I’m not sure if it works for every sent email.
    • On the other hand, I also use a GTD “Waiting for…” list to track items waiting for a reply. → 2.7.8

To conclude, emailing notes to ourselves is semi-private. We’ll see the email as part of the thread, but others won’t. This way, we can leave notes in place, even in threads with others.

Here are some concrete contexts where I’m adding notes in an email thread:

  • code review comments
  • ideas about a project we’re discussing
  • capture an idea on the phone, which can be seen later on the desktop when I’m processing emails

Appending information in a bottom-up system like GTD and Zettelkasten

Both GTD and Zettelkasten are bottom-up approaches for getting a grasp on ideas. These frameworks don’t start with what we want to achieve but what we have now.

In GTD, the idea development process is the Natural Planning Model. In a Zettelkasten, this is the follow-up note method (or Folgezettel): letting ideas be developed naturally.

The outline-based Zettelkasten

As I mentioned, follow-up notes show how an idea was sparked and developed over time. Understanding this development process heavily depends on the context of the actual Folgezettel.

Since follow-up notes show us the idea development, we can safely say that we aren’t storing the result of our thinking but the thinking itself.

What’s more important is to keep these ideas structured so we can follow their line of thinking even for years to come.

I can’t say that Luhmann’s Zettelkasten implementation was a big outline because it is way more complicated than that. But I still like to organize notes in a master outline structure for my version of the Zettelkasten since high-level branches are what get me started on an idea that becomes something more complex later.

The Zettelkasten outline shows me the history of idea development. When I add a new note to the Zettelkasten outline, its place will define the order of the note relative to others. It means that the note is connected to a parent and/or a sibling so that I can see the development of an idea in a thread-like structure.

I only append to the Zettelkasten outline and never move stuff around since I use numeric IDs to mark their fixed position. This is a customized version of the alphanumeric note ID that Luhmann used in his Zettelkasten.

Since mine is organized in an outline structure, there is no need to link all notes to every direction. In the tree structure, all notes can be connected to a parent, next, and previous sibling. Not all of these connections are present, but one will be there since a note needs to be appended somewhere in the outline.

Because we usually organize conversations around threads, our thought development can be understood as a conversation with ourselves (or our Zettelkasten, if we use the analogy by Niklas Luhmann).

The outline-based Zettelkasten will force us to think about the place of a note in relation to other notes. Much like the physical Zettelkasten, in an outline-based digital version, we have to append the note to a tree structure. This method will ensure that we automatically have follow-up notes.

The capture log

One of the most interesting steps of GTD is the capture step. A capture log is a journal-based version of the inbox, where ideas are appended in a timeline-based manner.

The capture log was an idea first mentioned by Merlin Mann, where he explained that he wanted to yell into the void and let Siri capture his ideas with automatic metadata like creation date, location, and, optionally, the weather. It’s yet another inbox that we have to process.

The inbox is a medium that stores items that change frequently. It is a temporary holding place for new information in the short term. We mainly change information in it (add and remove), but in the append-only workflow, these items can be kept as an idea log, too. If we use inbox items as a trigger to create new projects and/or next actions in our GTD system, after creating these, we can complete source items in the inbox and log them. In that sense, we have a capture log as an automatic journal where we keep a history of our ideas. As Merlin said, it’s like the tail of our life.

Keeping versions

There are two ways people keep file versions around. If you worked on any source material like Word or Photoshop documents, you are probably familiar with versioning your files using the “Save As…” command.

There is an ongoing meme about sending the “final final final” version to a client, so in theory, this is not a desirable workflow. Still, with a proper workflow in place, we can use it to mark milestones in a document lifecycle.

But before we go there, let’s talk about Git since it’s a tool created for this exact task: keeping versions of files.

Versioning with Git

Git is an append-only information storage system, too, because when we change code in the software development context or update any text kept in a Git repository, we’re adding a new state to a source material. We pack it up in a commit, which is then appended to the log.

Versioning makes software development more manageable since we don’t have to worry about how changes are looking in our working copy: the code is constantly forming. The state stored in Git will show changes, mistakes, refactorings, and removals, which is the natural part of everyday work. Git lets us see the natural evolution of the code base, which is similar to other examples mentioned here.

Git can be used for keeping the history of non-code-based source files, too, like photos, illustrations, PSD files, Markdown writings, etc. My Zettelkasten is a Git-based source material, which I use as a starting point to write about interesting ideas.

People forget that Git isn’t just tied to store source code. We can create a Git repository for almost any source material we’re working on and keep a history of the evolution of these files.

Keeping manual versions

Sadly, keeping a Git repository works only with file-based apps. It doesn’t work for database-based apps like Ulysses, which I’m writing this article in.

On top of Git, it’s still worth keeping manual writing versions, especially after reaching milestones like the first draft, the first edit, or the version before spell-checking. We can usually keep manual versions around in database-based applications by simply duplicating the primary resource of the app.

I like how Aaron Draplin duplicates layers in Illustrator to keep a history of changes and branch out new ideas. In the same way, I duplicate groups in Ulysses for writing projects so that I can have a trackable / branchable writing workflow. Ulysses also keeps versions of projects, but manual versioning can be tied to milestones in the writing workflow.

My versioning system is based on the following rules:

  • I keep a group where all sections are sheets, then I duplicate these groups before significant edits and assign version numbers for each group, like v1, v2, etc. These names have no meaning other than having a version number for the group.
  • The triggers for duplicating groups can be the following:
    • Collected and sorted my Zettelkasten notes.
    • Finished the first draft.
    • Checking grammar with Grammarly (which is just another form of editing).
    • The final version before publishing the post.
      • It can change, so this group will allow me to compare what type of changes I usually make after I publish something.

Conclusion

In this post, I collected many workflows that follow the append-only organization system. To recap:

  • Email can capture information and take notes in conversation threads.
  • The outlined-based Zettelkasten allows us to create follow-up notes for long-term thinking and idea development.
  • Git and manual versioning is a great way to try out new ideas on source files.

These workflows are appending new information at the end of a stack, so we will have a breadcrumb to see how changes affect our work over time.

The main idea I would like to highlight is that by appending information, we don’t delete anything; we add new information at the end. Having all changes visible in the chain (even the bad ones) makes it harder to erase mistakes.

2022.09.03.

Using Apple Reminders for GTD

The built-in tools of macOS are capable of serving a complete GTD system, making it possible to fully automate it without additional software.

These tools aren’t made for GTD per se, so we must strive to implement a simple system for ourselves. We have to focus on achieving goals using our GTD system, not perfectly organizing our stuff.

There aren’t many people who use macOS tools to their full potential. It happens probably because not many people can think in systems; they expect the tool to give them a system. macOS doesn’t provide you with systems. It is a general OS that needs to be bent to the GTD way of things.

The new features of Apple Reminders make it capable of replacing more serious task management apps. There is no better time to consider using Reminders as a free alternative to OmniFocus or Things.

I will show you how to set up Reminders for a GTD-inspired workflow in this post.


Creating two groups for our lists

We can create two types of lists in the Reminders app: traditional lists, which can be used for planning, and smart lists, which are best used for everyday work.

Traditional lists are simple containers where we can organize and store reminders. It’s similar to having a list of reminders written down on paper, but a digital reminder can do way more than its analog relative. It is essential to mention that we can indent reminders under each other on these lists, which we will use later.

Compared to this, smart lists can be updated automatically. They can sort and display reminders for us based on predefined parameters, which makes them the perfect candidate for creating context-based lists. There is no way to show a reminder with sub-tasks on a smart list. Fortunately, we don’t need to manage sub-tasks in a GTD system by default because every project should have concrete next actions. If you need a checklist for a next action, you can store that inside the reminder’s notes field.

To organize our lists appropriately, we have to create two groups that will split our lists by type.

  1. First, we have to create a “Planning” group that will organize our lists used for project-based planning.
  2. Second, we need to add another group called “Doing,” which will contain our context lists.

Using the “Planning” group

The “Planning” group represents one of the two horizons of GTD, where we see our next actions grouped by projects.

We will keep our traditional lists organized inside the “Planning” group so that each planning-related list will be in one place. It can help if you create separate lists for each of your responsibilities, like personal or work projects.

These lists will contain projects by keeping top-level reminders for every project, and then its next actions will be listed as a sub-task under the project’s reminder. By organizing content this way, we will connect projects to next actions.

Contexts will be assigned using tags, which is one of the new features of Reminders running macOS Monterey and iOS 15. If there aren’t any tags set on a reminder, we should consider it as a future next action, which we can’t do anything about immediately, but we want to avoid forgetting it. Keeping project plans in Reminders is fine for smaller projects, but for more significant projects/goals, we should keep our notes, possible next actions, plans, assets, and ideas in a separate app.

If we assign dates for these reminders, they will show up on the Today list on the day we set; also, we can keep track of upcoming reminders on the Scheduled list as their date is approaching, basically using this feature as a digital Tickler File.


Connecting next actions to projects

Lists inside the “Planning” and “Doing” groups are used to sort our next actions by project and context. I should mention some caveats though related to this list organization method.

  1. First, our events/appointments/meetings are still kept separately on our calendar, so we have to review them individually.
  2. Second, there is no logical difference between a project-related reminder and a next action-related reminder inside Reminders. If you are coming from a dedicated task management app like OmniFocus or Things, it can feel weird at first when we use the same type of reminder for projects and next actions as well.
  3. Third, relating next actions and projects can be challenging, resulting in more time spent on system administration than necessary (I write about this in more detail below).

Now, it’s time to talk about the nuances of the connection between projects and next actions. In the original GTD implementation, there is no connection between them; everything is on separate lists; we are the ones who logically connect these once a week during the Weekly Review.

Nowadays, task management apps are training us to see tasks listed directly under their project. But what about other types of next actions that we keep in other apps, like our calendar? We can only assign next actions to projects that we hold in our task management app; these apps don’t keep track of our calendar events. During Weekly Reviews, we can be under the impression that all we have to think about related to a project are the tasks listed under it, forgetting about other places like our calendar. We have to connect those to their corresponding projects manually in our head. It would be a better workflow to let the software handle these connections automatically; sadly, no such software exists yet, so we have to find the logical connection between things, so our minds can see the whole picture.

Connecting next actions to projects can also slow down inputting information into our system. In the classic GTD implementation, all we have to do to add a new item is append it to the appropriate context list. Suppose you want to keep track of the relationship between projects and next actions. Additional information will be needed—usually in a different form field—which slows down the input process. When the only thing that we have to fill in is the task’s name, we think more about how we should name it (knowing that we won’t see the project related to it). We will phrase more precise next actions, so we can imagine the physical activity better before we start doing it, which results in less procrastination, and more work being done without much thinking.

It is good to know (from the UI point of view) that Reminders won’t display the projects on context lists because—compared to OmniFocus and Things, where the project and the context are actual properties of the to-do—in Reminders, the project is just a structural connection (the parent of a reminder).

As you can see, connecting next actions to projects inside Reminders can be cumbersome because we have to set up a tree-like structure where next steps are nested under projects using drag-and-drop. When you have an Inbox list (which we will talk about later), you have to drag the reminder to the corresponding list inside “Planning,” then click on the list again in the sidebar, find the reminder, and drag it under its project. The last step can be done using keyboard shortcuts, but it is far from being as intuitive as assigning projects to next actions in OmniFocus or Things; people accustomed to these apps can feel like this step is a chore in Reminders which results in more time spent on system administration than necessary.


The tag

As I mentioned before, there is no difference between project reminders and next action reminders, so it’s a good idea to set the tag for reminders which are representing projects. You are right to ask: why is there a need for this tag when every next action is a sub-task of a project reminder defined as a parent?

First, not every next action is related to a project. You will create a bunch of singular to-dos which doesn’t need to be assigned to a project because they can be completed alone, for example, “refill paper in the printer,” “clean the desk,” “moan the grass,” etc. Since these reminders are not represented as sub-tasks, they will show up at the same level as projects, so it’s a good idea to differentiate these singular next actions from projects.

The second thing which can make the tag useful is highlighting orphaned projects. As we complete the five steps of GTD, we will end up with projects with no remaining next actions because (if we are lucky) we’ve completed the project, or (which happens more frequently) we forgot to capture a next step about the project. There is nothing wrong with that: this is why we keep the project list around, so we can remind ourselves to define next actions for every one of our goals. If our project reminders are marked with the tag, we can find orphaned projects more quickly in a long list; we don’t have to stop and think about if the reminder represents a project or a singular next action.


The Someday/Maybe list

The goal of the Someday/Maybe list is to have a place where we can collect things that we aren’t engaged in right now. This list can contain stuff that we’re are “cooking”: can be ideas, inactivated projects, dreams, goals that need to be achieved in the future, etc. We don’t think of them as “active” right now, but any one of them could be activated, “maybe someday.” We keep the Someday/Maybe list in the “Planning” group, so we’ll have a place to save these items later.

Here’s a good idea to integrate into your habits when a project becomes inactive: remove every tag of every reminder representing the inactive project and its next actions, then move these over to the Someday/Maybe list. This way, our project list is kept clean, so we will not think about outcomes that aren’t available right now; also, next actions from inactive projects will not show up on our contexts lists inside the “Doing“ group. We know that our context lists show only to-dos, which are actionable right now.

It is crucial to review the Someday/Maybe list from time to time (ideally weekly) since it can quickly turn into a dumping ground for random ideas, which we never review. If you use the Someday/Maybe list this way, you’ll become a compulsive collector: you capture things, but you throw them into a never-reviewed self, and in the end, you’ll end up with a lot of unused stuff.

According to GTD, your mind can’t let go of something until you give that thing the proper attention. We have to review our whole system habitually because that’s how our mind can relax and be sure that it will encounter information stored in an external system regularly.

When you introduce a new habit, you have to prove that you do it regularly. The only way to integrate a new behavior into your identity is to make your brain trust that it is done habitually (trusted system). When this happens, we change our identity and turn the habit into autopilot mode; our brain will rest and let go of the burden of reminding.

As you can see, you have to agree with yourself that the Someday/Maybe list needs the same attention and maintenance as the whole system so it doesn’t turn into a place of forgotten ideas.


Using the “Doing” group

We have to be in constant motion to gain back control. Rather than starting from stillness, it’s way easier to change the direction of something that already moves. One of the fundamental aspects of being in control is taking the appropriate next action at the right moment, which could propel you to the final goal.

You achieve change with a bunch of small steps, done consistently. It is similar when comparing the directions of two vectors starting from the same point. Over time, the endpoint of two vectors can get far from each other, even when you have a couple of degrees difference in their directions at the starting point.

Using next actions, we can slice and dice otherwise hard-to-do processes into smaller pieces, so over time, our life will be in a state where we can declare a project done. Because a next action is atomic, it has to formulate an actual physical activity.

If the meaning of an activity (tracked in an external system) is not apparent, then the brain has the burden of thinking about it again, which uses up a lot of unnecessary brainpower to figure out stuff you already figured out. You should be able to imagine any next action physically without thinking about it too much. You are more likely to complete a physical activity if you can imagine it in your head, which reduces the chance of procrastination.

When you start to do real work, next actions have to be obvious, so you can quickly scan through a list of tasks on a context list. The best thing to do is find similar steps, then do those in batches to avoid multitasking with many unrelated activities.

It’s easy to slice your work into different situations, like when you are at the office and want to accomplish something quickly or have a phone and 10 minutes to do one or two short calls. These situations are called contexts which we represent with tags in Reminders.

We mainly use smart lists inside the “Doing” group to filter reminders that have at least one context tag assigned (I also like to keep other lists inside the “Doing” group, like my Groceries list, which I share with my wife); we set tags up for every next action when we add them inside the “Planning” group. You can organize next actions via drag-and-drop as well: when you drag a reminder onto a smart list, Reminders will apply every tag from the smart list’s filter.

The goal of keeping context lists is to remember if you have a list for different situations. If you do, you can open it and review your possible next actions. You do this multiple times a day; every time, you have to ask yourself: what’s the next thing to do?


Reviewing the system

Using the “Doing” and “Planning” groups, you can sort your content by projects or contexts. This way, you can immediately review your system in any situation based on the nature of the work.

The “two horizons” based sorting is usually available in serious task management apps like OmniFocus, but with the system described here, you can have a similar setup with Reminders.

We discussed the importance of reviewing context lists in the previous section: we sort our next actions by context because we should see only tasks that we can pick in the current situation (considering the limits of the context). The classic example of situational limitations is when you sit on a plane, and you see “moan the lawn” on your “Home” list… well, you can’t do that since you’re on a plane.

Usually, there are two types of next actions on our context lists:

  1. Activity-based next actions, which can be done within the limits of the context. A descriptive next step can help you imagine how the activity will look when you do it.
  2. Verb-based next actions, where we are doing something about or something with the item that the reminder directly mentions. Usually, you can do these activities in one sitting, like utilities to pay, articles to read, receipts to organize, etc.

If we look at contexts, we can see natural and artificial contexts.

  • When you’re in a natural context, you automatically reach for the list at the right moment.
  • For artificial context, you need an external reminder to check the proper list (such a reminder can be your calendar, where you can create an event to check the context list; this way, you can block out a couple of hours to do just one type of work).

We use project-based sorting in planning mode to answer higher-level questions. Projects are adding directions to otherwise seemingly dumb processes. You can’t keep a process under control without a concrete project—a project is like a stake in the ground. During planning, you can get a project under control using the following process in your head (or for complex projects, using external tools such as mind maps and outlines):

  1. A brief description will automatically make you imagine a successful outcome for the project: try to phrase it in one sentence.
  2. By creating next actions, you slice the project into smaller, achievable pieces. If you do these next actions, your project will become a reality after a while.

Project planning can give you a direction, but it doesn’t mean you will accomplish your goal the way you planned.


Linking external assets

There are project-related assets like project plans, emails, and references which you may want to access quickly. Reminders is one of those Apple apps (next to Notes) which integrates with the “User Activity” system.

If an app supports Handoff, its content is probably linkable from Reminders. You can create such links in two ways:

  • You can open Siri and tell her to “Remind me about this.”
  • You can select any text in the source app, control-click on it, and share it with Reminders using its share extension. Some apps can share their content directly with Reminders.

Above that, we can link to content using URL schemes and deep links.

  • If we paste a link into a reminder’s notes field, it will turn into a clickable link.
  • Also, every reminder has a dedicated URL field that can contain web and application links. If you paste a link here, Reminders will show a small thumbnail under the reminder. You have to click on the link, and the resource will be loaded.

You are right to ask, what’s the point of connecting reminders with related assets? If you think about it, the asset is the noun, and the reminder is the verb which clears up what we should do about or with the noun. As you can see, the two go hand-in-hand, making our life easier by giving us a shortcut from the verb to the noun.

Writing down our thoughts on paper is the best way to untangle and give order to them. Paper has a tactile feel, and its freeform nature makes it a natural tool for this task. Digital tools are better at making information searchable; they can also store the results of our thinking, so we can naturally use them in conjunction with paper.

Knowledge is distributed between our mind and external tools supporting it. These tools can rely on our brain’s recognition capabilities to remind us of things; you can harvest this unique relationship between tools when you have to recollect a context, a project, an action, or any other project support material.

Supporting our minds with external tools gives us a shared system between the two, where the sum of the two results in knowledge. This way, you can use the best tool for the job: your mind to figure things out and external tools to store that knowledge.

As you can see, managing the connection between reminders and related support material can shorten the time between a thought and an accomplishment.


Setting up and using an optional Inbox list

We can’t let go of something until we pay attention to it. We need to have directed awareness, so we must write down potentially meaningful stuff floating around in our minds. GTD can help you with that, but you need to be mindful. Our brain constantly thinks about unclear stuff to indicate open loops: you must pay attention to that.

You have to collect (write down) ideas, have to’s, should to’s, anything that is potentially meaningful to you, then review and decide about what each item means, what you’re going to do about it (if anything), and finally pick where is the result of your thinking is going to be stored.

When everything is in its place, your brain can let go of this mess, relax and accept the current reality.

Almost every task management app includes a section for unprocessed items (called the Inbox), which makes the collection and processing GTD step easier; you can store things in your Inbox which are still uncleared. You can adapt something like this in Reminders, too, by creating a new list called Inbox. You can set this as the default list, so you can instantly start collecting things you haven’t decided about yet.

Using the Handoff integration mentioned in the previous section, you can add new items system-wide to Reminders similarly to other GTD apps. New reminders added via Siri and the Share Sheet will automatically appear on the Inbox list.

You can also use the Inbox list as a form of a temporary notepad to plan a project and its next actions. On this list, you can unpack a whole project with all related next steps, which can be dragged to their final places at the end.


Simple GTD

The workflow I introduced to you above is just one way to integrate GTD with the free Reminders app built into Apple’s platforms.

The point of GTD is to make sure that what you do at the moment is the right choice from your options, so your brain can focus on the current moment and stop worrying about the past and the future. We have to trust our system and use its list habitually.

When we’re reviewing our lists, we will trust that by storing the results of thinking in an external system, we will pick the right thing to do in the proper context—having a system that works like well-oiled machine guarantees that we will reach the goals that we picked for ourselves.

2022.07.04.

Answering follow-up questions about the Process perspective

I linked yesterday’s post on the Process perspectives in a bunch of places and generated a bit more negative feedback than I expected. I was confused because I still think this is a cool trick to have in your toolbox. As “cornchip” said it on the MPU forums:

This is a nice tactic to add to the swiss army knife of tools needed to break up a stagnant list.

I see great questions emerging in the discussion around this trick, which I wanted to answer here to provide a bit more logic.

Should I replace this with the GTD Clarify and Organize step?

Don’t use a remixed version until you are confident that all the habits around GTD are wired into your brain. Afterward, you can use this perspective to enhance your existing inbox emptying habit progressively.

Do I have to tag everything that goes into OmniFocus?

No, but you can. There is a setting in OmniFocus called “Clean up inbox items which have” which controls when OmniFocus should remove items from your inbox on clean-up. Mine is set to projects; otherwise, the Process perspective won’t show actions grouped by project.

Kourosh mentioned that this could lead to untagged/unprocessed items leaking into the system from the inbox, which is technically accurate, but don’t forget if you use this trick:

  • a: the Process perspective always shows unprocessed items which you can clean up,
  • b: if you do Weekly Reviews properly, you should trust your system, but more importantly, you’ll review everything again and catch these items.

Do you still use the OmniFocus Inbox?

Yes. As I mentioned, this perspective is great for breaking down a long list of unknown stuff, but sometimes I straight use the Inbox because it’s easier.

Isn’t it an unnecessary step?

It depends. I wouldn’t call it “productivity p0rn” because it genuinely helps to clarify the unknown.

Imagine you have to clean up a messy kitchen. First, you start to pre-organize: collect the dishes, throw away junk into a trash bag, etc. Then, you wash the dishes, clean the kitchen table’s surface, and get the trash out; sooner than later, you end up with a clean kitchen.

We do the same thing here: we’re pre-organizing a long list of stuff, so we can make sense of how much cleaning we have to do, then we clean each item in context with their related entities. This way, we keep our attention a bit more focused and keep support material easily reachable (especially if you link associated things in the notes field of your projects).

The point is to reduce the unknown and add structure to the inbox processing habit. You don’t need to do this all the time, but after, let’s say, 20 unprocessed items, this can be a beneficial step.

Don’t you keep too much stuff in your OmniFocus Inbox?

As David Allen says, I keep everything in the inbox which is “potentially meaningful” to me. Maybe, in the end, I only save 10% and throw away 90%, but the point of using an inbox (and GTD, for the matter) is to empty our head, and keep it that way.

There is an excellent video about this topic from the Next Action Associates called “What’s The Difference Between An Input And An Inbox?“.

Why do you need access to projects when you process your inbox?

It’s simple. Because I have support materials linked to projects in their notes field. I need to access them via links (and Hook) to store future actions, notes, etc. Having a list of items grouped by projects lets me easily select the project in the list, invoke Hook, or click on the links in the notes.


I hope this post answers your questions about the Process perspective and makes you reconsider adding it to your OmniFocus toolbox.

2022.07.02.

Reduce context switches in the OmniFocus Inbox using a Process perspective

I watched a video from Cal Newport on how he uses a simple text file for the sense-making of a bunch of new information. He mentioned that instead of processing his emails one by one, he captures the essence of every email into his text file, then starts to categorize it, organize it by projects, etc. This gave me an idea about solving a similar problem I had with my GTD inbox for a while now.

GTD recommends that we process our stuff in the inbox sequentially, without grouping beforehand. The problem with this approach is that many items related to different projects are scattered in our inbox, so we’re jumping in and out of projects while processing our inbox. This constant context switching drains energy from our brain.

If we want to spare our attention, it is a good idea to group our unprocessed inbox items by project, so we can reduce the context switching when we process them. Using this approach for the GTD Process and Organize steps will ensure that we clean things related to each project in one go, not randomly.

I will show you how to do this inside OmniFocus, but you can also steal this approach for Things using a similar “Process” tag.

Why is this a problem?

The point is to add a temporary structure to information in the inbox. I usually do some form of project planning and next action creation when I’m emptying my inbox. The problem is that I constantly switch thoughts about many different things as I go through each item. It would be nice to have them batched and grouped by their project. This can reduce the attention switching to different topics/projects.

Let’s say we have an inbox like this:

  • Item 1 (could be about Project X)
  • Item 2 (could be about Project Y)
  • Item 3 (could be about Project Z)
  • Item 4 (could be about Project X) ← This is where I will have to return to “Project X” again. This item can even be connected to “Item 1” somehow.

I hate when I have to switch my current context (not my GTD context, but the current mindset that I’m in) and go back to a project I already thought about and assigned a next action to; possibly, I even closed its support material since then.

Having new information pre-organized by projects (or topics) can reduce the load of thinking about a project twice or more in an inbox processing session.

Using the Process workflow

  1. The first step is to create a new perspective in OmniFocus called Process with the rules shown on the screenshot above. You’ll use this perspective to process things instead of the standard OmniFocus Inbox.
  2. It’s essential to have everything corralled into the OmniFocus Inbox, so you can stop jumping around different inboxes, but more importantly, have everything pre-organized by the project. Go through your inboxes (email, Slack, DEVONthink, etc.) and link a new action to all unprocessed items in OmniFocus. The Hook app can help a lot with this step.
  3. Open the Process perspective, where you’ll see your unorganized stuff sitting in the Inbox waiting to be pre-organized. You must quickly go through each item and assign it to an existing or new project (don’t assign tags). You don’t have to come up with the final name for a new project. Set whatever comes to your mind; the important thing is to pre-organize unprocessed items in this step. If you don’t know where to assign it, just skip it, or move it into a singular action list related to an area.
  4. When you have pre-organized everything, you can click the clean-up button (or press Command-K) to see all of your unprocessed items grouped by project. Now you can go through each item and deal with them in the context of its project instead of having them all over the place.

Why having a pre-organized inbox is better than a flat list of unknown stuff

I always get annoyed when I deal with something related to a big project in my inbox, and then 5 minutes later, another thing pops into my view about the same subject. I have to open the project and its support material again, get into the same mindset, and maybe even reconsider everything I figured out 5 minutes ago. It is a dumb way to plan things.

I’ve been pre-organizing inbox actions by the project for about a month now, and I can assure you that having unprocessed stuff grouped by the project can make a big difference. I can process my OmniFocus Inbox about 15-20% faster than before, but more importantly, I don’t feel tired after doing it. I stopped switching contexts for every item; instead, I’m spending more time at the project level and dealing with new things from this perspective.


I wrote a follow-up post to this one answering reader questions about this workflow.

2022.02.23.

Archive Hook bookmarks with DEVONthink

I was in a Tinderbox Meetup last week, which was more about Hook than Tinderbox. I’m not a Tinderbox user, but I’m interested in how other people use their tools.

In the middle of the call, somebody had a question about Hook bookmarks. More specifically, can Hook archive its bookmarks as archive.org does with websites in general? Well there is no feature like that in Hook, and to be honest, doesn’t even need to be, because Hook has great Apple Script integration, so we can query bookmarks from its database.

In conjunction with DEVONthink, we can archive our bookmarks from Hook and save them as Pinboard does. I made a script for this a while back and it’s really helpful. It runs once a week, archives all websites from my Hook database into DEVONthink.

Setting up the script

First, download the script from here.

The scripts collect everything into one group in DEVONthink, so you have to create one where the archive can be stored. I would advise a new database even if you don’t have something similar already.

Open the script you downloaded. You’ll see two lines at the top of the file.

set webArchiveDatabaseUUID to "databaseUUID"
set hookedWebsitesGroupUUID to "groupdUUID"

You have to replace the databaseUUID and the groupdUUID part with the UUID of the database and group from DEVONthink. To do this, open DEVONthink, ⌃click on the database in the sidebar, and pick “Copy Item Link”.

Now, replace databaseUUID, with the link you copied. You’ll see something like this.

set webArchiveDatabaseUUID to "x-devonthink-item://CA3A9072-0650-4AF3-A608-1786F9D1A98D"
set hookedWebsitesGroupUUID to "groupdUUID"

Now, remove the x-devonthink-item:// part, so the top of the script should look like this.

set webArchiveDatabaseUUID to "CA3A9072-0650-4AF3-A608-1786F9D1A98D"
set hookedWebsitesGroupUUID to "groupdUUID"

Go back to DEVONthink and copy the group’s link from the same database (it is important to keep the group in the same database) by ⌃clicking on it and picking “Copy Item Link” again.

Replace groupdUUID with the copied link in the script again.

set webArchiveDatabaseUUID to "CA3A9072-0650-4AF3-A608-1786F9D1A98D"
set hookedWebsitesGroupUUID to "x-devonthink-item://B6C2C659-5682-45B5-8D59-107A641F8C2D"

Remove the x-devonthink-item:// part and then save your changes. The top of the script should look something like this now.

set webArchiveDatabaseUUID to "CA3A9072-0650-4AF3-A608-1786F9D1A98D"
set hookedWebsitesGroupUUID to "B6C2C659-5682-45B5-8D59-107A641F8C2D"

Now comes the fun part. You can run the script and DEVONthink will start downloading your Hook bookmarks into the group you choose.

The first run can take a while depending on the size of your Hook database. Subsequent runs should be faster since the script downloads only newly added bookmarks.

It is important to know that the script doesn’t sync Hook and DEVONthink, deleted bookmarks from Hook will still be present in DEVONthink.

Also good to know, if you want to archive sites behind a login, you have to sign-in in DEVONthink before you run the script.

Triggers

I keep this script in the ~/Libary/Scripts/Applications/DEVONthink 3 folder, so it’s available from the script menu in macOS – or in my case, from FastScripts. This way, you can run the script manually from DEVONthink.

You can even make it run automatically. If you use FastScripts, you can create a new DEVONthink reminder on the group you created to store Hook’s bookmarks and set it to run an Apple Script like this every week.

on performReminder(theRecord)
	tell application "FastScripts"
		set scriptItem to first script item whose name is "Archive Hook Bookmarks"
		tell scriptItem to invoke
	end tell
end performReminder

If you want to run it outside of DEVONthink, you can use for example Lingon, which makes it possible to run any Apple Script in the background daily, weekly, monthly, or whatever interval you want.

2022.01.24.

2022.01.16.

Refactoring my GTD system – part 5: the Mobile inbox

I’m using GTD for almost ten years now. I consider myself an advanced user, but I want to simplify my system, my tools and return to the basics to get better at the end. I started refactoring every aspect of my GTD system—digital and analog as well. This is a series about how I did it and why.


Paper is still with us, and we have to be prepared to keep it somewhere temporarily until we process it. GTD says that we have to keep a physical inbox at home and the office, but what about those times when I’m on the road?

The best way to manage incoming, paper-based material when away from my inbox is to keep a folder in my bag: it is my mobile inbox where I can collect stuff when I’m out for multiple days or going to a meeting where I expect to receive papers. I can park notes from my Capture Wallet, contracts, quotes, reference documents, invoices, contact cards, etc.

Following David Allen’s advice, my mobile inbox is a plastic manila folder. I use a plastic one because it’s more durable—a paper folder would quickly fall apart in my bag. I like the manila style because it’s easy to throw stuff into it, which is one of its disadvantages too: I have to be a bit more careful when I lift it because things can slip out.

For some reason, manila folders are not very popular in Europe. I couldn’t find plastic ones in A4 size, so I had to order a couple of them from Amazon. Smead is a US-based company that makes excellent quality manila folders, although these are letter-sized ones. In my opinion, the difference between letter size and A4 is negligible for a folder that I use to hold papers temporarily.

It is vital to treat the mobile inbox the same way as I do my other inboxes. When I arrive back at my desk, I unload the contents of my mobile inbox into my physical one for later processing. When I’m on the road, the folder is my physical inbox, so I process stuff directly from it.

2021.08.06.

Refactoring my GTD system – part 4: using Apple Watch as a safety net for capturing

I’m using GTD for almost ten years now. I consider myself an advanced user, but last December, I wanted to simplify my system, my tools and return to the basics to get better at the end. I started refactoring every aspect of my GTD system—digital and analog as well. This is a series about how I did it and why.


I already talked about the various capture tools I use in my GTD practice. I wanted to expand upon my Apple Watch usage a little bit more.

Since I have my Apple Watch with me (almost) all the time, it makes sense to use it as a secondary capture tool. I have two watch faces set up so that when my primary capture tools are not with me, I can still easily have a mechanism for capturing.

It’s best to use the Apple Watch for dictation or writing with its Scribble feature, but these methods are not made for lengthy talking/writing—although I never had a problem with that. I usually jot down or dictate a couple of quick thoughts here and there.

I use Drafts at night by capturing my notes with Scribble and Voice Memos for dictation when driving or walking. Each of these contexts has a corresponding watch face set up: a red Modular face with a Drafts complication used during the night, and an X-Large watch face which has a big, easy-to-tap Voice Memos icon in the middle for driving and walking.

I try to automate when these watch faces should show up. When my Apple Watch switches into sleep mode, Shortcuts changes my active watch face to the red Modular one. I also get a notification to change my watch face to the Voice Memos button when I leave home.

When I don’t have my phone or my notepad with me, the Apple Watch still can be used as a safety net for capturing. Like the old saying of “the best camera is the one that’s with you,” I can also say that the best capture tool is the one that’s with you.

2021.07.18.

Refactoring my GTD system – part 3: keeping capture tools everywhere

I’m using GTD for almost ten years now. I consider myself an advanced user, but last December, I wanted to simplify my system, my tools and return to the basics to get better at the end. I started refactoring every aspect of my GTD system—digital and analog as well. This is a series about how I did it and why.


I have to prepare because I’ll run into things through the day which has a potential meaning to capture either via writing or dictation. Therefore, I have to keep capture tools in those places where I frequently show up.

By default, my preferred ubiquitous capture tool is the Capture Wallet, but there are contexts where I can use tools that are more appropriate and convenient.

At my desk

I can take notes slower and easier at my desk, so I use a Baron Fig Confidant notebook. I use a journal format: each day gets a header, I keep everything in a list annotated via Patrick Rhone’s Dash Plus method. I can capture ideas, track my time using timestamps, write down what I did; sometimes, I even use it as a regular journal.

My Baron Fig Confidant is a versatile tool. Since it has pages with a dotted grid, I can use it for mind-mapping, diagramming, and wire-framing. I can keep the digital noise away by using an analog tool for thinking.

In the car

It’s essential to use a capture tool that is quick and doesn’t need much attention while I’m driving. I found that the easiest to use capture tool is my Apple Watch and the Voice Memos app.

I also keep a notepad here to capture ideas (sometimes even groceries lists). When I’m driving, I’m asking the person sitting next to me (usually my wife) to write stuff down for me. The notepad is shared, so my wife can capture her stuff as well. Since we’re frequently discussing agenda items in the car together—which always triggers new stuff to capture—it’s convenient to keep a shared notepad at hand.

In the bed at night

I can have ideas in the bed in three contexts:

  1. Before sleep, when the lights are still on, and we’re talking about something with my wife (or I’m reading).
  2. In the dark when I wake up in the middle of the night.
  3. In the morning when I’m reading.

I keep a small notepad next to the bed, which I use when the light is still on or in the morning. I wear my Apple Watch during sleep for sleep tracking, so it’s natural to take notes using Drafts digitally. I use the Scribble feature to write in the dark: usually, I capture no more than just a couple of words to remember the idea next time.

On rare occasions when something still bugs me, and I wake up because of it in the middle of the night, I have to grab my iPad to write down longer forms of thinking. Usually, I can sleep well after I captured what was on my mind, but it’s more important to capture these things during the day, so I can go to bed with a clear mind and sleep well.

Keeping a checklist of capture tools

I have a pretty extensive set of capture tools, and it can be dangerous if I forget to dump stuff I collected into my inbox. Before I start to process my inboxes, I go through a checklist of these tools to make sure I gathered everything into one place to continue to process them.

Habits are also essential to form: I do drop things into my inbox on my own from my more frequently used capture tools like my wallet or Drafts. But I still use a safety net in the form of a checklist, so nothing lays around unprocessed at the end.

2021.05.04.

Refactoring my GTD system – part 2: the Capture Wallet

I’m using GTD for almost ten years now. I consider myself an advanced user, but last December, I wanted to simplify my system, my tools and return to the basics to get better at the end. I started refactoring every aspect of my GTD system—digital and analog as well. This is a series about how I did it and why.


I like to use my iPhone as a capture device, but the elegance and simplicity of the David Allen Notetaker Wallet is something I wanted to explore for a while now. I prefer paper for capture and general note taking because:

  1. it doesn’t notify me about anything,
  2. it doesn’t have a battery,
  3. there is no way to multitask on paper,
  4. and it’s the classic example of tools that do one thing well.

You can’t buy the David Allen Notetaker Wallet anymore, but I found a good alternative called Capture Wallet which copied it almost as-is, but it’s a good thing. There are two versions: “Artisan” and “Business.” I use the latter one because it’s more minimal and also cheaper.


It is way more convenient to use perforated notepads for the GTD capture process because I can tear pages off. Each page contains one (maybe two) notes, which makes processing stuff easier—I can deal with one thing at a time, then throw it away. Because I regularly tear-off notes and drop them into my inbox, my notepads are always fresh and clean; I don’t carry around old stuff as I do with notebooks.

I still use my iPhone as a secondary capture device. I have Drafts installed (which I consider as the digital version of the Hipster PDA), so I can write things down when I don’t have my Capture Wallet around, although I prefer it over my phone.

2021.05.02.

Refactoring my GTD system – part 1: list managers are overcomplicating our systems

I’m using GTD for almost ten years now. I consider myself an advanced user, but last December, I wanted to simplify my system, my tools and return to the basics to get better at the end. I started refactoring every aspect of my GTD system—digital and analog as well. This is a series about how I did it and why.


The initial version of GTD is based on more straightforward tools than most digital list managers. It is essential to learn how to do GTD in the default way because each step and tool has a purpose; there are no unnecessary things. We’re doing something wrong if we can’t keep our GTD system up and running with just the tools and ideas mentioned in the book.

Avoid having a connection between projects and next actions

Many list managers connect projects with the next actions, but in the original GTD approach, there are no connections between them. Everything is on a different list. We’re the ones who connect everything when we do the Weekly Review.

Digital list managers connect only subsequent actions to projects; they skip calendar events, project plans, etc. We have to find these on our own, but doing it can be confusing. When we do the Weekly Review, we can be under the impression that all we have about a project is the next actions connected to it, forgetting other activities like events on our calendar. We have to get the pieces together of all the remaining stuff for ourselves. It is way easier if the software can connect everything to us, but there is no technology capable of doing this, so we have to find the logical connection between things. Having seen the entire picture is the only way we can relax our minds.

Connecting subsequent actions to projects can result in unnecessary steps when adding a new to-do. Using simple lists is straightforward: we add a new item, and we are done; on the other hand, having a connection between projects and next actions is meta-information, usually yet another field to fill, which makes adding things slower.

If we don’t expect to see the title of related projects in our next actions lists, we will be more considered about how to phrase our actions. It results in a more precise next action which we can imagine easier, thus doing it without much thinking later.

Having many features is distracting

Professional task managers have many features which have to be set up and maintained, which takes a lot of time. These features can be helpful, but GTD doesn’t need more than having simple lists. We can even do the right thing at the right time with GTD on paper where advanced features are absent.

Before we try to solve a problem with advanced tools, we have to consider using something simpler which can yield the same result. For example, we can use paper to think, but store the result of that thinking in digital tools. Having many features can distract us from work by fiddling with the tool. The importance of a project is not defined by the tool we’re using to administer it.

2016.11.26.

My Notebook System (part 3): Field Notes Pocket Notebook

There is a bit analogue cult going on nowadays. Lot of people are returning to paper based note taking. I get it, having a phone is great, but it is also a trap of lot of things: instantly forgetting why you took out your phone in the first place. Pocket memo books are returning and I'm really glad they are back. Finishing up the third instalment of my notebook usage series, I'm going to talk about how I use my pocket Field Notes.

I love GTD. It is the best way for me to get everything in control and lose the fear of forgetting something. I'm not going to write about how GTD works, David Allen has already did that, but I have to mention the steps of Capture and Process, since this is what I use my pocket notebook for. There are a lot of ways to capture things digitally, but those things are usually coming from external sources. I work as a web developer, so I have to deal with clients, bug reports, and emails every day. I need to have a frictionless way to capture those, and I have that in a form of Siri or Drafts. But what about my ideas, my internal noise, how's that gets captured?

This is where my pocket Field Notes comes into the picture. My EDC usually contains my phone, my watch, and my pocket notebook. I can capture things on my phone, which I do sometimes, but there is so much noise. I don't want to deal with that when I'm writing down a great idea. Those are the moments when I'm really glad that I've got into the habit of keeping a Field Notes memo book with me all the time. They are bringing back those times when a tool just did one thing. I'm fine without my phone for a while, but capture is critical. When something comes into my mind that I have to write down, I instantly grab my notebook.

I also have a big Steno at my desk, but I'm not carrying that around. My pocket notebook is basically with me for those moments when I not working at my desk. Sometimes I even just throw it out on the table while we are having a meal with my girlfriend. We usually eat together once a day, that's when we discuss about stuff to do. My Field Notes just sits on the table waiting for capturing stuff. I wouldn't do that with my iPhone.

At the end of the day I just open my Field Notes and go through each item I've written down. I usually just make lists starting with a dash, which later turns into a plus when it gets processed. I've stole this idea from Patrick Rhone's Dash/Plus which is a complete system for marking up lists. It's pretty great if you keep your task lists on paper. Everything in my Field Notes gets moved into my digital task manager. I define projects and next actions needed for the current item. If it's non actionable but I want to keep it, then I transfer it into Notes which contains my project support and reference material. When I'm done, I just convert the dash into a plus in my notebook. When I processed everything, I make a double line at the end which marks the current processing point. It means next time I will just deal with things coming after this line.

I usually use a Field Notes memo book for 3-4 weeks, depending on how much I travel. When I'm away, I fill them so much quicker, so I have a lot to spare. I also keep an empty one with me while I travel – you never know when your are going to run out of a Field Notes in the middle of writing down something great. It's also important to carry this memo book around with me all the time. There are a couple of items always in hand reach for me, and my pocket Field Notes is one of them. I even bring it with me when I go for a walk. I leave my phone at home, but my Field Notes and my Fisher Space is with me all the time to capture ideas.

These small memo books have really changed the way I write things down, and also how much mindful I am using my phone. Since I don't use it for capture anymore, I have a less chance to go down into the rabbit hole of distractions. I've started treating my devices as tools, not as something that controls me. Going back to paper was really successful for me. It is easy to use, peaceful and a natural way to express our ideas into external stuff, which can be transformed into the real thing.

2016.07.07.

My notebook system (part 1): Field Notes 56-Week Planner

I was one of those "paper is dead" guys. We all have some kind of mobile device with productivity apps installed on them, why would you use paper? Actually, my devices got me into using notebooks again. I spend so many time with screens. I'm a developer, so using my iPad for development made me a bit more aware about adding dedicated tools to my tool belt. Couple of months ago, I've read an article about carrying a pocket notebook which instantly made me want to have paper with me all the time.

Since then, I've tried so many Moleskines, but eventually I've settled with Field Notes. I love their quirky designs; their memo book looks like an everyday tool that I can tear apart. Currently, I use three Field Notes notebooks for different things. I like to have a specific placement of my work tools. My iPad Pro is centered. On the left side, I have a Field Notes 56-Week Planner: I use that as a daily planner and a calendar. On the right side, I have a Field Notes Steno used for todo lists, notes, and work journal. I also have a pocket sized notebook always with me used as an inbox to quickly capture ideas.

Problems with digital calendars

I've never owned a paper planner — I used those card sized yearly calendars years ago, but it wasn't anything like a full-fledged planner. Nowadays, I use Apple's Calendar app for time sensitive stuff like meetings and appointments, but I've also started carrying around a paper based planner from Field Notes. I've realized that there are things I just don't like about digital calendars (or Reminders or any other task management app).

I usually have a daily plan for things I want to touch on that day listed along with my meetings and appointments. It's a great map to have, but my digital calendar is not going to work for this type of workflow. When I add something to it, I have to specify not just a date, but hours and minutes too. To be honest, my work has a really small part that has anything to do with specific dates and times, so planning things like this doesn't makes sense to me. Sure, I have deadlines of projects, but those more like anchor points of priorities.

My digital calendar is also hidden in an app. I'm all for keeping important stuff digitally, but I also want to reach my calendar quickly. I can open my calendar app really fast, but I want it to be like "look down next to my iPad" fast. Having a paper planner always next to my iPad is exactly what I need.

Writing on paper also feels better than dragging stuff around on a timetable. Digitally stored events are long forms that I have to fill every time I add or change something. Sure, I can use Siri or Fantastical, but that still feels unnatural to me. Not to mention, Fantastical's natural language parser works only with new events. Start to edit existing stuff and you're thrown back to a form.

Going back to paper: Field Notes 56-Week Planner

About 2 months ago, I've started using a small Field Notes memo book as a daily planner. It was great, my only problem was it's size, so I ordered their 56-Week Planner (56 instead of 52 to have a buffer month to order a new one, maybe). It's been great since then. The Planner is bigger than a pocket notebook, it has thicker paper, and more pages. It gives me a weekly spread divided into six equal sections. The last section, representing weekends, divided once more for Saturday and Sunday. I have 7 days worth of space to add plans and events. Also, it has only 10 lines per day which protects me from overplannig my day.

My usage of the Planner is really simple. I review my schedule every morning. First, I look at my digital calendar which contains my hard landscape (I have to be at somewhere at a specific time). I like to keep these appointments in Calendar, because then my Watch pings me at the right time. I also transfer them into my Planner. Writing it down makes me more aware of them. Then I have my next actions list stored in Reminders, which I review and pick a few items that I also write down in my Planner. This way, I'm not setting false due dates for myself in Reminders which causes stress by constantly pinging me at different times through the day. And remember, I just have 10 lines to write for one day which limits me picking too much stuff. Interesting tidbit: I never use pens with my Planner since plans can change, so I use a pencil with an eraser.

I love to work this way. With my Field Notes Planner, I can have a whole-week view of my life. I can easily plan projects and next actions in advance without feeling stressed about notifications through the day. It's also really nice that I can rely on an single-purpose analog tool. Checking things off my Planner gives me the feeling of accomplishment, which is truly the first time since I use a productivity tool.

2016.05.26.

Using iPad Pro as a web developer

I've never thought I will have a need for an iPad Pro. Back in November when it got released, I was using a 12-inch MacBook, which is the best laptop for mobile development. It's light and thin, I don't feel it's weight in my bag, and it has a Retina display. I travel a lot, so portability is my main concern when I get a new device. My MacBook was great, but I've always wanted to use iOS as daily driver. I was already using my iOS devices way more then my MacBook, but my work was still revolved around OS X. iPad Pro was the first iPad which made me think about switching to an iOS based workflow.

Moving my development environment to the cloud

The main problem with an iPad based Rails development workflow is that you can't run code locally. You have to find a way to host and run your web apps on a server somewhere. There are services for cloud based development already like Nitrous.io or Cloud9, my problem with those is that they are usually a complete IDE running in the browser. I want to use native apps, so I just need SSH access to a server somewhere running my code and hosting my Git repos. Getting a VPS for this is way cheaper. Also, there are some advantages using a remote server for web development:

  • I don't have to worry about messing up my development environment. Since everything is hosted on a single purpose server and always backed up, I can broke and replace the client which I’m connecting from. It feels liberating when you've spent so much time on administrative tasks to keep your development environment up and running.
  • I can access my server from any device, even from my phone. I know, it's not the best device to use for coding, but for quick fixes and running administrative scripts it's great. I also use two iPad Pros (iPad Pro devices?) in different contexts for work, so I can switch between them easily.
  • I can show changes instantly to a client. Lets say, I'm in a Skype meeting and the client wants a quick design change. I can update the code in realtime and get instant feedback. I also had problems with deploying to our staging servers before. Now I can just send a link of an app running on my server to one of my colleagues and he/she can check out the changes I did and have the staging server fixed later.

The cheapest way to have your own hosted development environment is getting a VPS, configure it, and use it over SSH. Before my Mac mini, I used a box from Digital Ocean that I set up on my own. It's cheap and quick. You can create backup images to reuse later if something gets messed up. They also have a great community site which have everything you'll need to know about setting up a VPS for different needs. I can't recommend them enough.

The other way is using a Mac mini as a server. There are companies doing Mac mini colocation, you can send your own Mini or buy one from them. You'll get a dedicated line, fix IP address, and great support, but I have a pretty good connection at home. Also, colocating a Mini is a bit pricy for my needs, so it was obvious to have my old Mac mini running at home. I'd bought a domain, then configured OS X Server on it. I was already familiar with OS X, so setting up a server was easy with a dedicated app. I have the same development environment as before, but I connect to it from different devices. It also works well as a home server with iOS, since OS X Server has services like Caching Server, file sharing, or device management.

The Mini runs Rails code and keeps my Git repos. There's a couple of great Git clients for iOS, but they store files locally, so I'd have to sync changes back to the server. Too keep the storage of my repos simple, I use Git over SSH in the command line. It's fine for basic stuff. If I have to do something more advanced, I just login into my Mac with Screens and use Tower there. I'm also using screen sharing for testing stuff in a desktop environment.

The iPad basically connects to the Mini over SSH and acts as a client. iOS has gone really far in terms of an everyday system and I try to use it as much as possible for everything.

Coda as a text editor

Currently my main editor is Coda on iOS. I really like that I can save sites and Coda can quickly load them as different development environments. I usually have a Terminal tab open to interact with the Rails console or Git next to currently opened files. Coda was really buggy at first. It crashed a lot on syntax highlighting and opening big files. Since the latest update, I can finally use it for work, although, I still have some issues with it:

  • Rails generates a lot of files and opening them is really annoying without Quick Open. Coda can browse remote servers fine, but finding a file is lot of tapping around in folders after folders. I'd like to see some kind of global search over remote files, even from Terminal (that would be even better, since I'm spending so much time in the command line).
  • Removing white spaces automatically is now possible thanks to EditorConfig support, but it only works on local files. The functionality is already in Coda, I just don't understand why isn't this working with remote files? Also, it should be an option in Editing settings, not hidden in .editorconfig files.
  • Although, Coda uses the local/remote concept of files even on the Mac, I'd like to see a way to open external files from Document Providers. There is Textastic which can do that and it works great in conjunction with Transmit.
  • Custom theme support would be really great too. It has a couple of themes built in, but I miss Solarized Dark from OS X. Coda on the Mac supports custom theme files since the beginning, so adding it to the iOS version would be the next logical step.

Why would I choose iOS over OS X for development?

iOS is forming at the moment. It's in active development and I'd like to embrace this. There are things way better to do on iOS and what can I say? I'm interested in trying out new things and see where technology goes in the next 5 years, but mainly to eliminate my dependence of a desk and work everywhere.

Many apps I used on my Mac were old ones like vim or Logic Pro (I edit podcasts too). iOS doesn't have those apps or they exist in a different form. Every app I use feels like a fresh start. Even a complex app like Coda is simpler than it's Mac counterpart. This is due to the fact that iOS started on the phone which have had smaller, single purpose apps from the beginning. People like to think of this as a disadvantage of iOS on iPad, but in my opinion it’s quite the contrary. I like to use native stuff over web apps and iPad have those. For example look at Trello, it has a great web app, but their iOS app is just stellar. I can search cards and boards from Spotlight, I don't have to open Safari, type an address, and try to find my stuff. Native apps have always been faster and on iOS you mainly find those in use.

So, I don't have the same set of apps as I had on my Mac since the platform is so different, but it doesn't mean I don't have great ones. Even my workhorses like Coda, Transmit, Prompt, or Screens blows my mind sometimes. Also, there is OmniFocus, OmniGraffle, Drafts, Trello, Workflow, Ferrite, Ulysses, and Overcast. Developers of these have thrown off the desktop mentality and reimagined them on iOS. I'm using more apps on iOS for the same task, but they are optimized for mobile which is great. They are even on my phone too.

Also, I've never used an iPad with cellular connection since I've never felt a need for it. But it really changes the way I think about the device. I'm on the same route as Myke, using two iPad Pros for different things. My smaller one has LTE which has made me to bring it everywhere. Always on cellular connection and those new kind of apps have a big role in my work now. iOS is not a translation of a desktop OS into a mobile OS. Instead, it's a completely new thing, which means I can't work the same way as I did before. I have to adapt new things and change my workflows to use my iPad efficiently. It sounds scary, but I'll gain new insights into my way of working and learn to do stuff in a different way. This is the biggest advantage of using mobile devices for development.